

Rollo de Guayaba
Why quarantine not only didn't change how I see life through food but it reinforced it

If you like Atole, I invite you to join my Patreon membership here, so I can keep on sharing beautiful food and stories with you every week (plus some extras!).
Bienvenidos :)
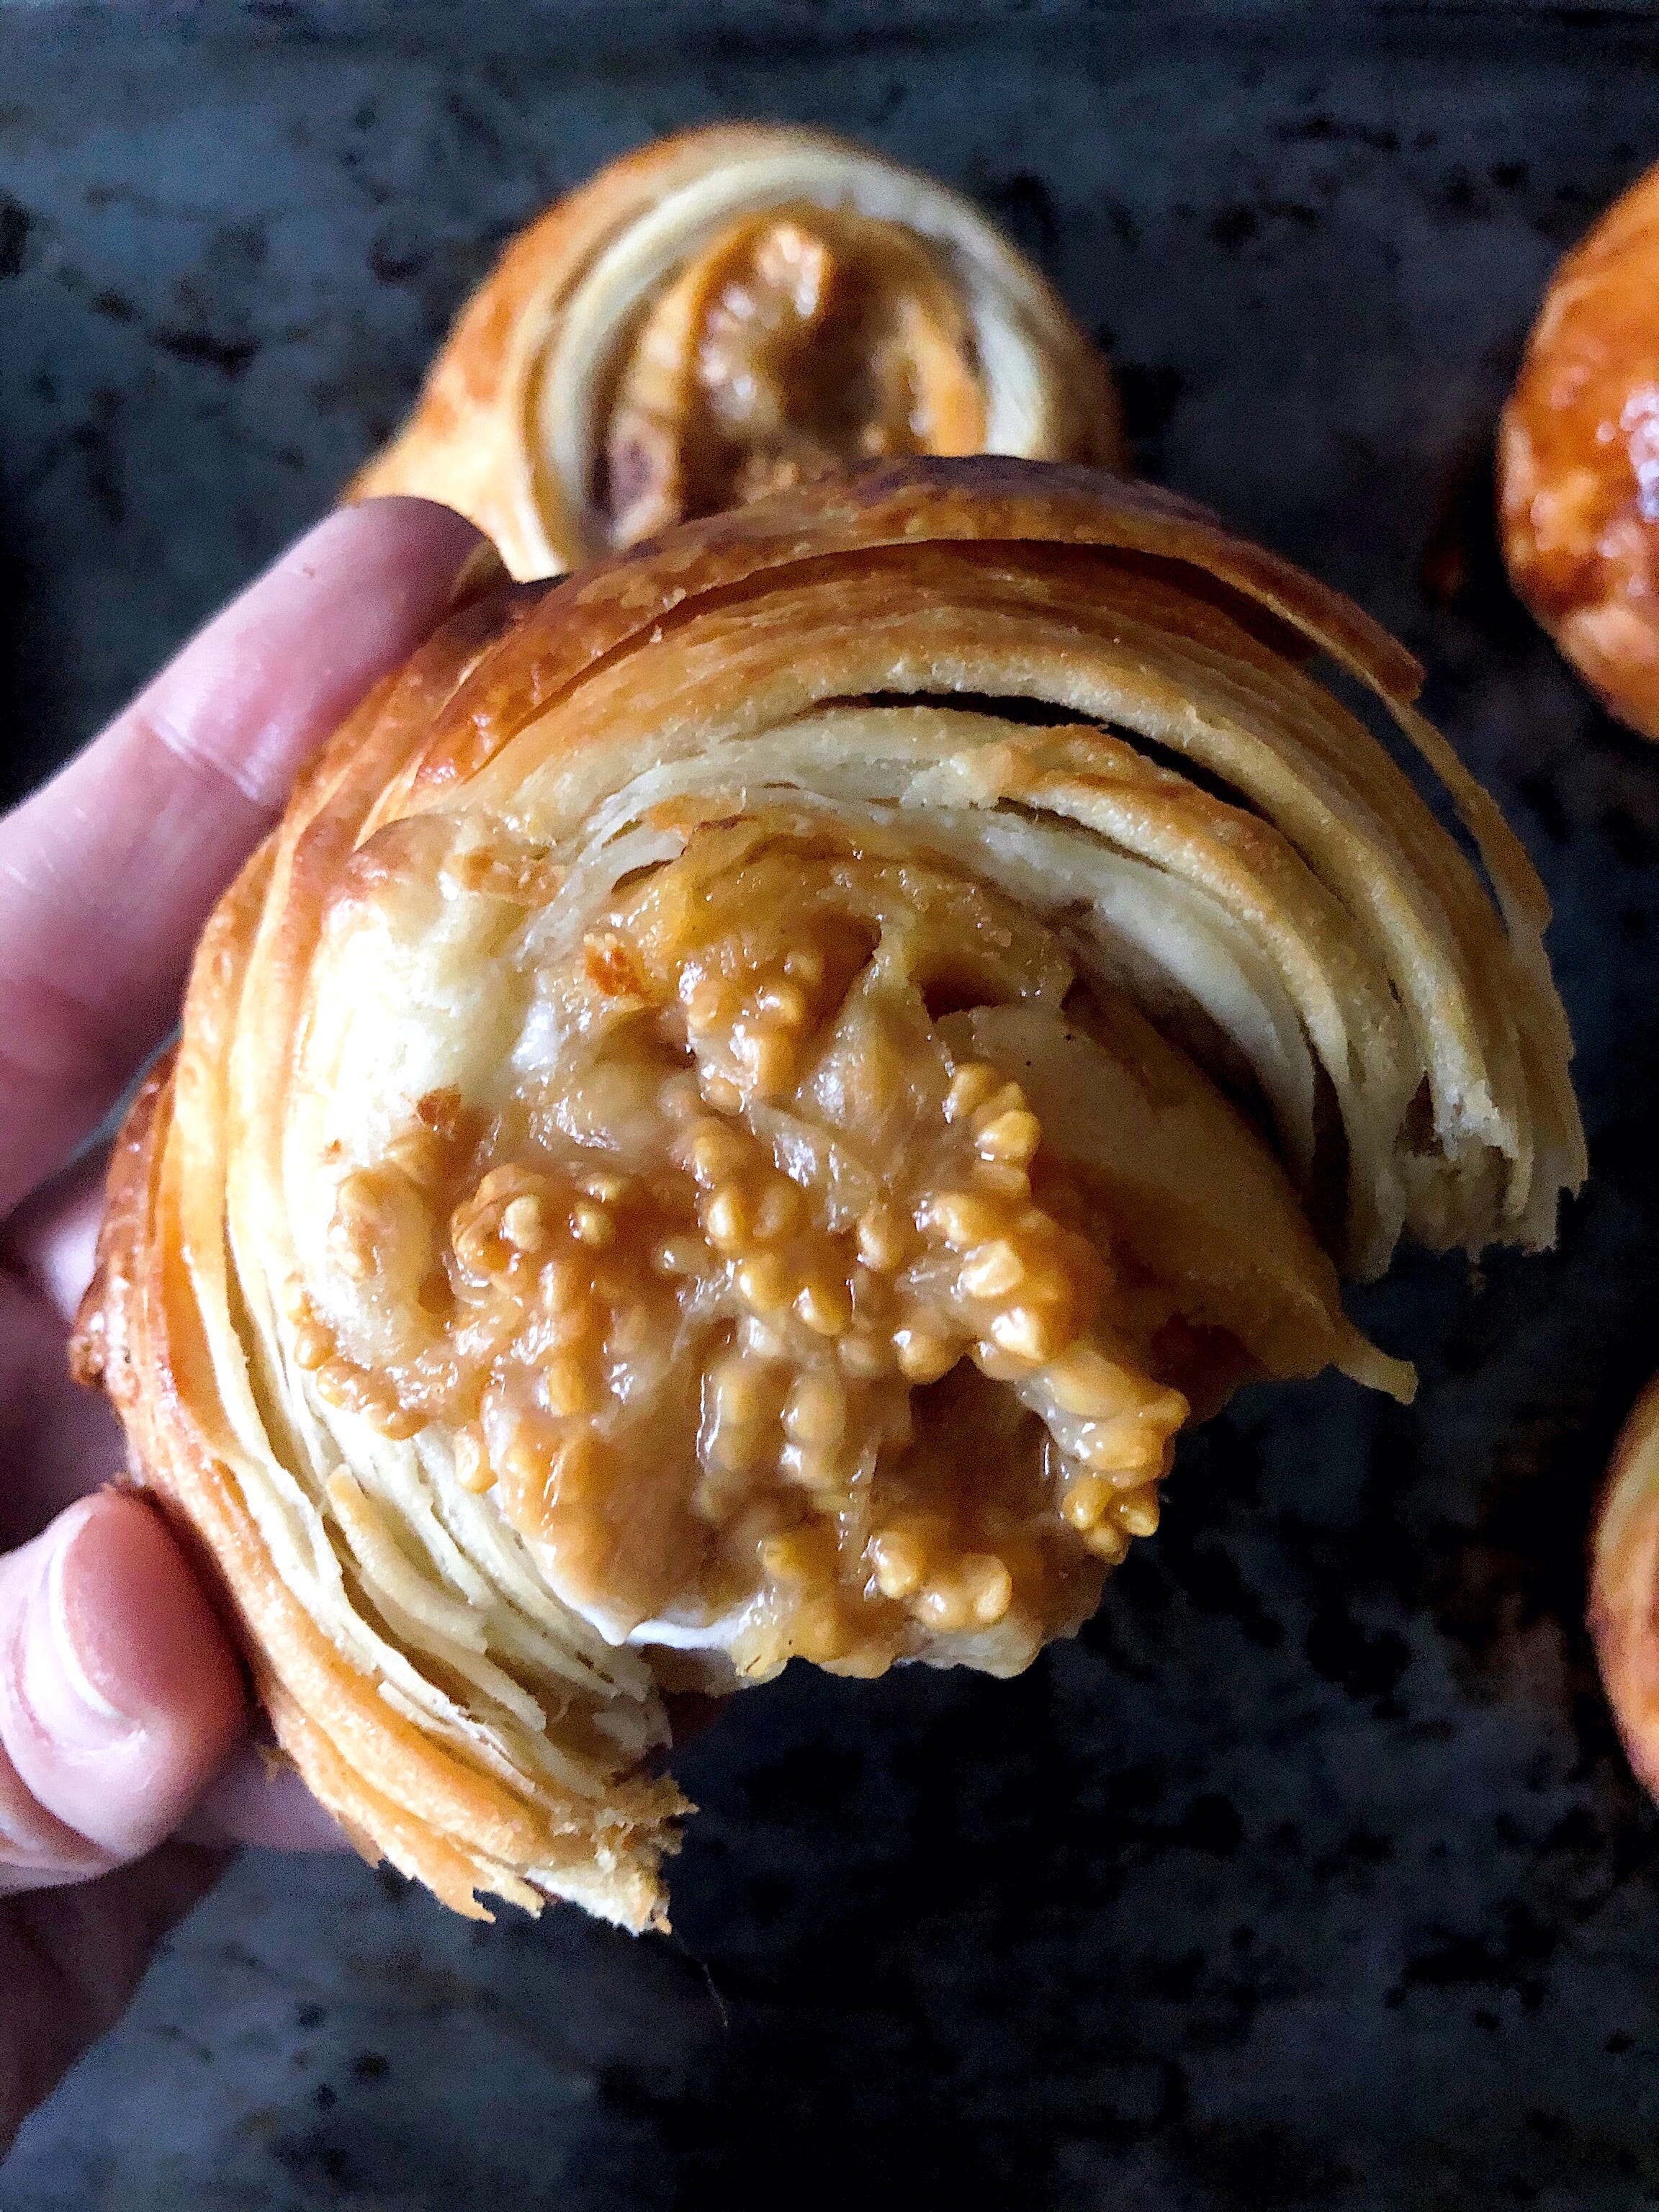
Thanks for pushing the link that brought you here. To inaugurate my incursion in this exciting, independent new form of publishing —where I plan to share recipes and all sorts of stories about food, on a regular basis—, I decided to reproduce one of the most emblematic pan dulces of the hip-Chilango food scene in my home kitchen: the “rollo de guayaba” from Rosetta panadería in Colonia Roma (Mexico City): a rounded, flaky, buttery, laminated-pastry with a cenote shaped hollow interior that generously houses a perfect marriage of cream cheese and guava marmalade.
Before venturing into doing so, I had been procrastinating about baking croissants —or any other layered pastry— for some time, on the pretext that I have an unreliable temperature-deficient oven, and was trying to avoid feeling disappointed by the results (although I knew I would have to repeat the recipe a few times before I’d accomplish anything decent, anyway). But quarantine kept presenting itself as the perfect time to materialize any pending cooking projects, so I finally took the courage and started experimenting a couple of weeks ago.
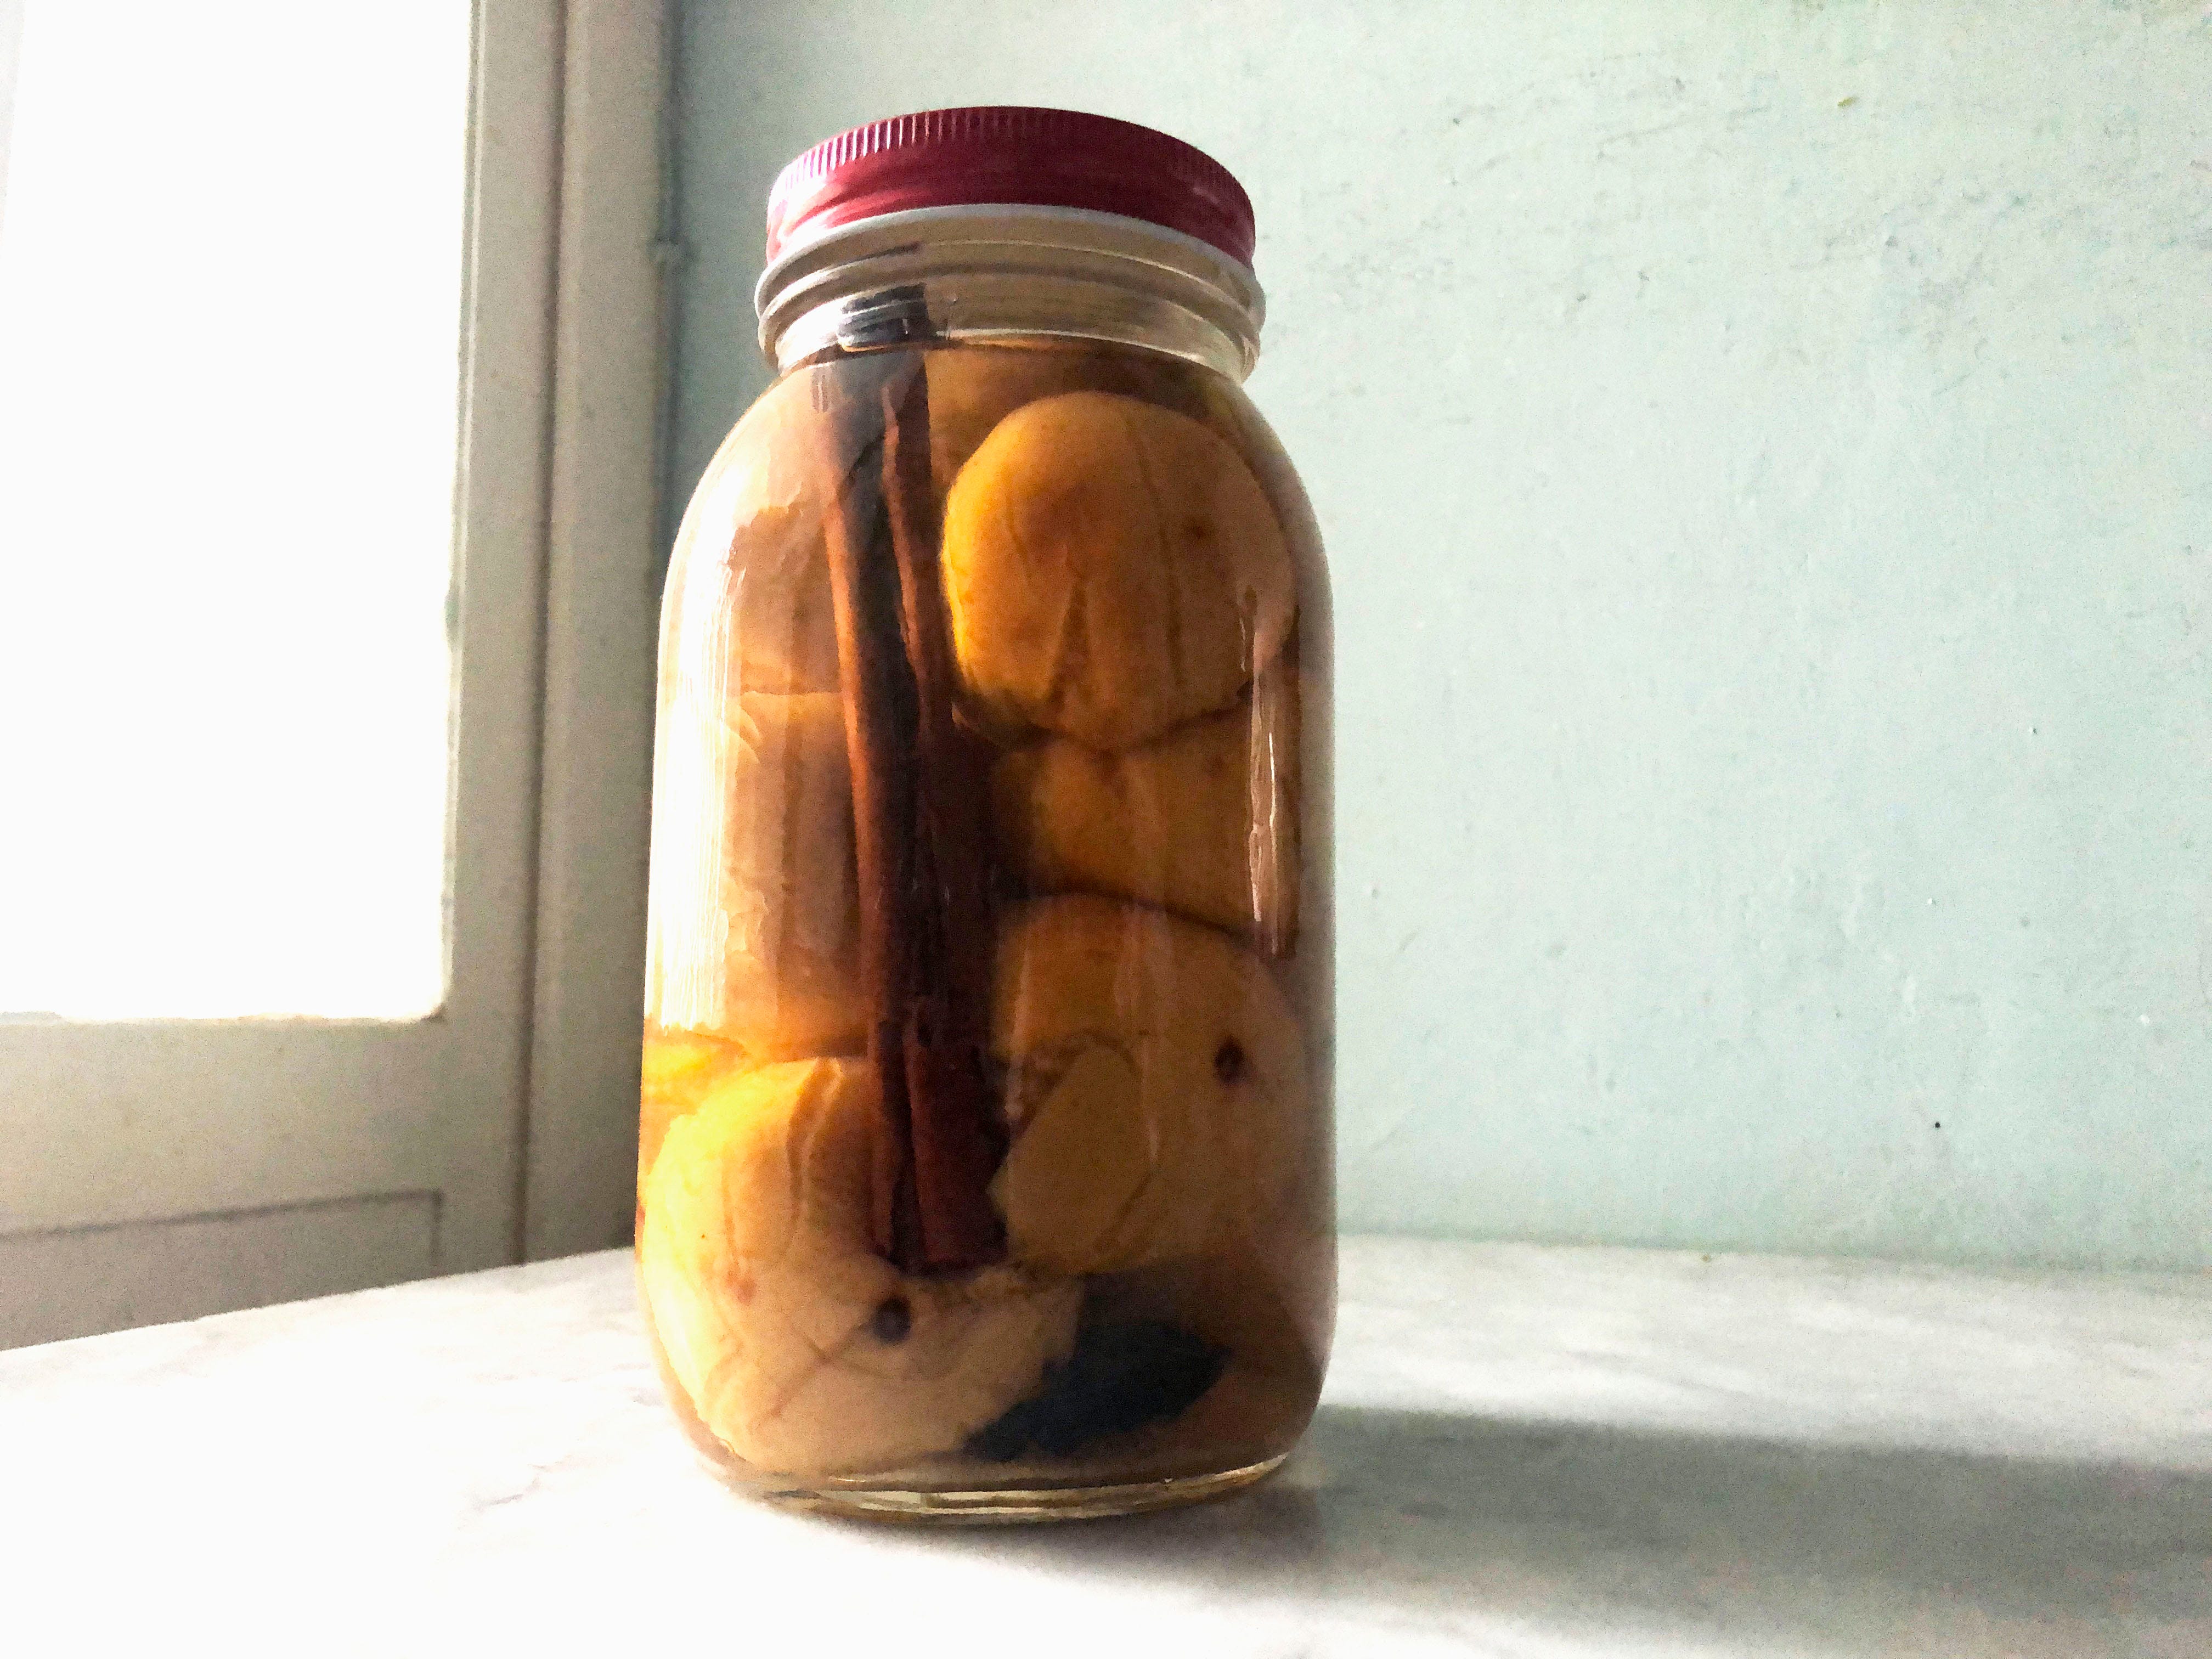
Since I was quarantining alone (my kids were staying with their father in Guadalajara until last week), I decided I would half the recipe, then half the resulting dough again, and save it in the freezer to work in small batches. If that still kept being too much bread for myself (for obvious reasons, my aversion to food waste has worsened in these past months), I would give it away to my neighbors. Also, I thought that by working in small batches I could use part of the dough to make other shapes. That’s when that famed roll came to my mind, along with a saved for a special occasion jar of my grandmother’s dulce de guayaba.
I haven’t bought the Rosetta cookbook, where the guava roll recipe is portrayed, for the same reason I’m writing this newsletter —among others— and that only became clearer to me by attempting to make it (I will explain later), but my friend, fellow cook, and beautiful salsa maker, Catalina Leo, kindly sent me a picture from her copy through WhatsApp.
I have a go-to layered dough recipe that I’ve been working with (and trying to improve little by little) for a while now. It is fair to say that I’m not at all lost when it comes to baking pastries; I did take a viennoiserie class at the San Francisco Baking Institute. So even though I wasn’t depending on using the dough recipe that comes in the book, It did catch my attention the fact that a trait that required so much work and practice to get right, as it is to make a layered-fermented dough by hand, could be so briefly explained in just a couple of columns, and with cero illustrations. In the beginning, I thought it lacked pages. But it didn’t.
The recipe for the dough was a hand-mix version, which I think is a good idea considering that not everyone has a stand-up mixer at home, but it wasn’t at all clear on a few important points…
It didn't detail the consistency that the dough must achieve after kneading and resting (which makes the difference between a soft, elastic, manageable dough, and one that is overworked and tense), being that its adequate result depends on more than just following the rules like they’re given, there are other variables that have to be taken in consideration: climate and humidity can provoke the resting times to vary. A person’s ability to knead can also determine the results; the technique on how to do it was only superficially explained, and, if you’ve never made any kind of leavened dough before, knowing how to knead properly can be challenging. The process on how to make the foldings was also confusing, it didn’t have specific directions on how to make a butter block or even a couple of drawings with examples. But the part that I struggled with the most with because I didn’t have any other references, was the shaping of the rolls. If I understood how it was explained, you’re supposed to roll them, cut them like cinnamon buns, and then punch them in the middle to insert the fillings; but if you watch the actual shape of the final roll, that doesn’t make sense, because the outside lines are twisted, not just plain on top; it seems more like some sort of a knot. On the other hand, on the finished picture of the roll, the filling seems to fall inside it, which is not achievable by just pressing the center with a spoon as it is instructed.
I have two bedside cookbooks for making croissants, Danish, and brioche: Advanced Bread and Pastry, by Michel Suas, that is a great technical reference for formulas, and Tartine Bread, which has a more of a personal approach, and that I think is, how all commercial cookbooks should be: it feels like an experienced voice, truly concerned that you get it right, is guiding you through the recipe... It takes 12 pages to explain how to make croissants, which are a couple of steps less complex to make than guava rolls are.
So, the reason why I avoid buying some —definitely not all (there are some amazing ones)— cheffy cookbooks, no matter how much I like the restaurants or kind of food they portray, is because I don’t want to regret spending money in a piece of work that is just “showing-off” food, instead of passionately and committedly sharing cooking knowledge. I have beautiful friends who give better directions to any recipe on their Instagram feeds for free.
Everything is about intention. Publishing houses should not fail to consider that there are some of us —in growing numbers, I dare to say— that do not only buy cookbooks to use them as coffee-table decorations; exactly the same people who will honestly appreciate and recommend them. I’m not trying to judge the author of this one, chef Elena Reygadas, finally, she’s a cook, not a writer or an editor, and I’m sure she has busted her ass and sacrificed twice as much as most male chefs to be where she is. That sure is admirable, but I ask her, and I ask myself, and I ask women cooks in general: how much have we molded ourselves to the imposed patriarchal, white, capitalist, ego-centered way of perceiving food for the sake of surviving in the “professional” world (meaning the one that favors restaurant elitism and still recognizes feminine talent on a “special” category), and how much are we fighting to bring a more feminine, nurturing, earth conscious, socially-equal vision into the table?
There’s this Masterclass commercial that resonates in my head every time I listen to it, about a chef who says that he decided to get into cooking when another chef told him: “chefs cook to nurture people”. To be honest, I don’t think that’s entirely accurate. Mothers (and a minority of fathers), cook to nurture their offspring and take care of their families, without getting any prize or pay for it. Chefs cook for money (and recognition). I’m not saying there’s something wrong with that, people are entitled to get paid for what they love doing and are good at, many chefs even go out of their ways to make their customers have memorable experiences, but it is a business transaction, not a selfless act (especially not, coming from the creator of one of the most expensive dining experiences in the world, if I may add).
A few weeks ago, in a Salt and Spine podcast, food writer Alicia Kennedy said the following regarding the Alison Roman controversy: The food media industry is so ego-driven because it rewards people who take credit. It rewards people who are loud, and rewards something that can be defined as “The Stew”, or “The Cookies”, or “The Pasta” - and that sort of thing. And it’s like, well, all these things have so many rich histories and go back to many cultures, but they get this brand name because of the ego of the personality behind it because there’s so much money behind that ego and personality from institutions.
I agree. No single person has property over no single dish. In fact, the term “signature dish” seems pretty cocky and foolish if you really think about it. Nobody owns food. Cooking is common knowledge, and it should be passed on humbly. That idea of “propriety” was constructed under the colonialist mindset that turned the food into merchandise, when its accessibility used to be a natural right (and admirably so, remains to be for a few groups that have defended their autonomy, like the Mexican and Central American rural communities who preserve the milpa system, along with the community-enhancing, life-reproducing, oneness-with-earth philosophy that it encompasses). That same stream of thought also conceived the concept of Haute-cuisine in the 17th Century, as a “superior” culinary movement (regional cuisines were considered “a product of ethnology not art”, as the latter), on the grounds that its rules and techniques were conceived by “illustrated” European white males (I wrote more about this subject on an article published a couple of years ago by Revista de la Universidad).
There has been a loud and clear stand on the media these days, against the idea of people being entitled over the lives of others on the basis of race, gender, social status, physical condition, sexual orientation, or just because they can. There’s has also been a continuously growing concern about the well being of the planet. Those are good things. Social change starts with awareness. But I can’t help but wonder If we’re as good at voicing out what’s wrong with the world, as we are in identifying the part that we’ve played. Because in what regards to the food “industry”, it seems to me —as irrelevant as it may sound— that it’s exactly in our compliance to these concepts of “excellence”, “exclusivity”, “authenticity, and “superiority” (along with the “stars” and “world’s best” systems), where human differences are fostered, and the conditions for injustice and violence are created. I don’t think much is going to change until we pull out those ideas from the roots.
I love restaurants, they’re an inseparable part of my life. I come from a country with an amazingly rich food culture that I became passionate about since I was small, but it was living in San Francisco’s Bay Area in the ’90s and being able to experience the California nouvelle-cuisine era at its peak, what really convinced me to consider cooking as a professional alternative (even though it took a lot of more years for me to figure out exactly in what way). Restaurants make our lives more interesting and exciting, but the sad truth that we’ve learned through this pandemic is that —although very desirable— they’re not indispensable. And that, on the other hand, has made us revalue home cooking, which, if you take the good out of the bad, It’s actually a pretty good thing.
I sure don’t know what the answer for a better post-Covid 19 world is (as much as I wish for that to be possible), but I do believe it could start with all human beings having the same access to good food. The more we learn about feeding and sourcing ourselves autonomously, and the more in-tune we become with nature, the better equipped we are going to be for survival in future emergencies. So, as much as I wanna keep going to good restaurants and having sublime experiences, I would love to see more women-run, independent, sustainable, home-oriented food and food education businesses flourish, and being more equally valued. This pandemic has given us a great opportunity to remold the food industry for the better. I hope we take it.
FERMENTED LAYERED DOUGH
(Makes around 12, regular size pieces, depending on the shape.)
WHAT YOU NEED
Ingredients
400 g flour
200 g pre-ferment*
70 g water
160 g milk
60 g sugar
10 g salt
5 g powdered instant yeast
20 g butter
200 g butter (for lamination).
1 egg (to coat).
*Pre-ferment
100 g flour
100 g water
15 g starter *you can substitute for 1 g of powdered instant yeast (in which case it would be called polish instead of pre-fermented dough), but if you don’t have a starter and want to make one, here’s a great video on how to.
*Remember It’s important that all ingredients are at room temperature when you start working.
Equipment
Stand mixer *not indispensable, I will include directions on how to kneed by hand.
Rolling pin
Ruler
Pastry cutter *can be substituted by the knife.
Chef knife
Brush for coating
Kitchen scale
Dough scraper or spatula
Regular size baking tray *you might need an extra, smaller one to rest the dough in the fridge.
Plastic food-wrapping paper
PREPARATION
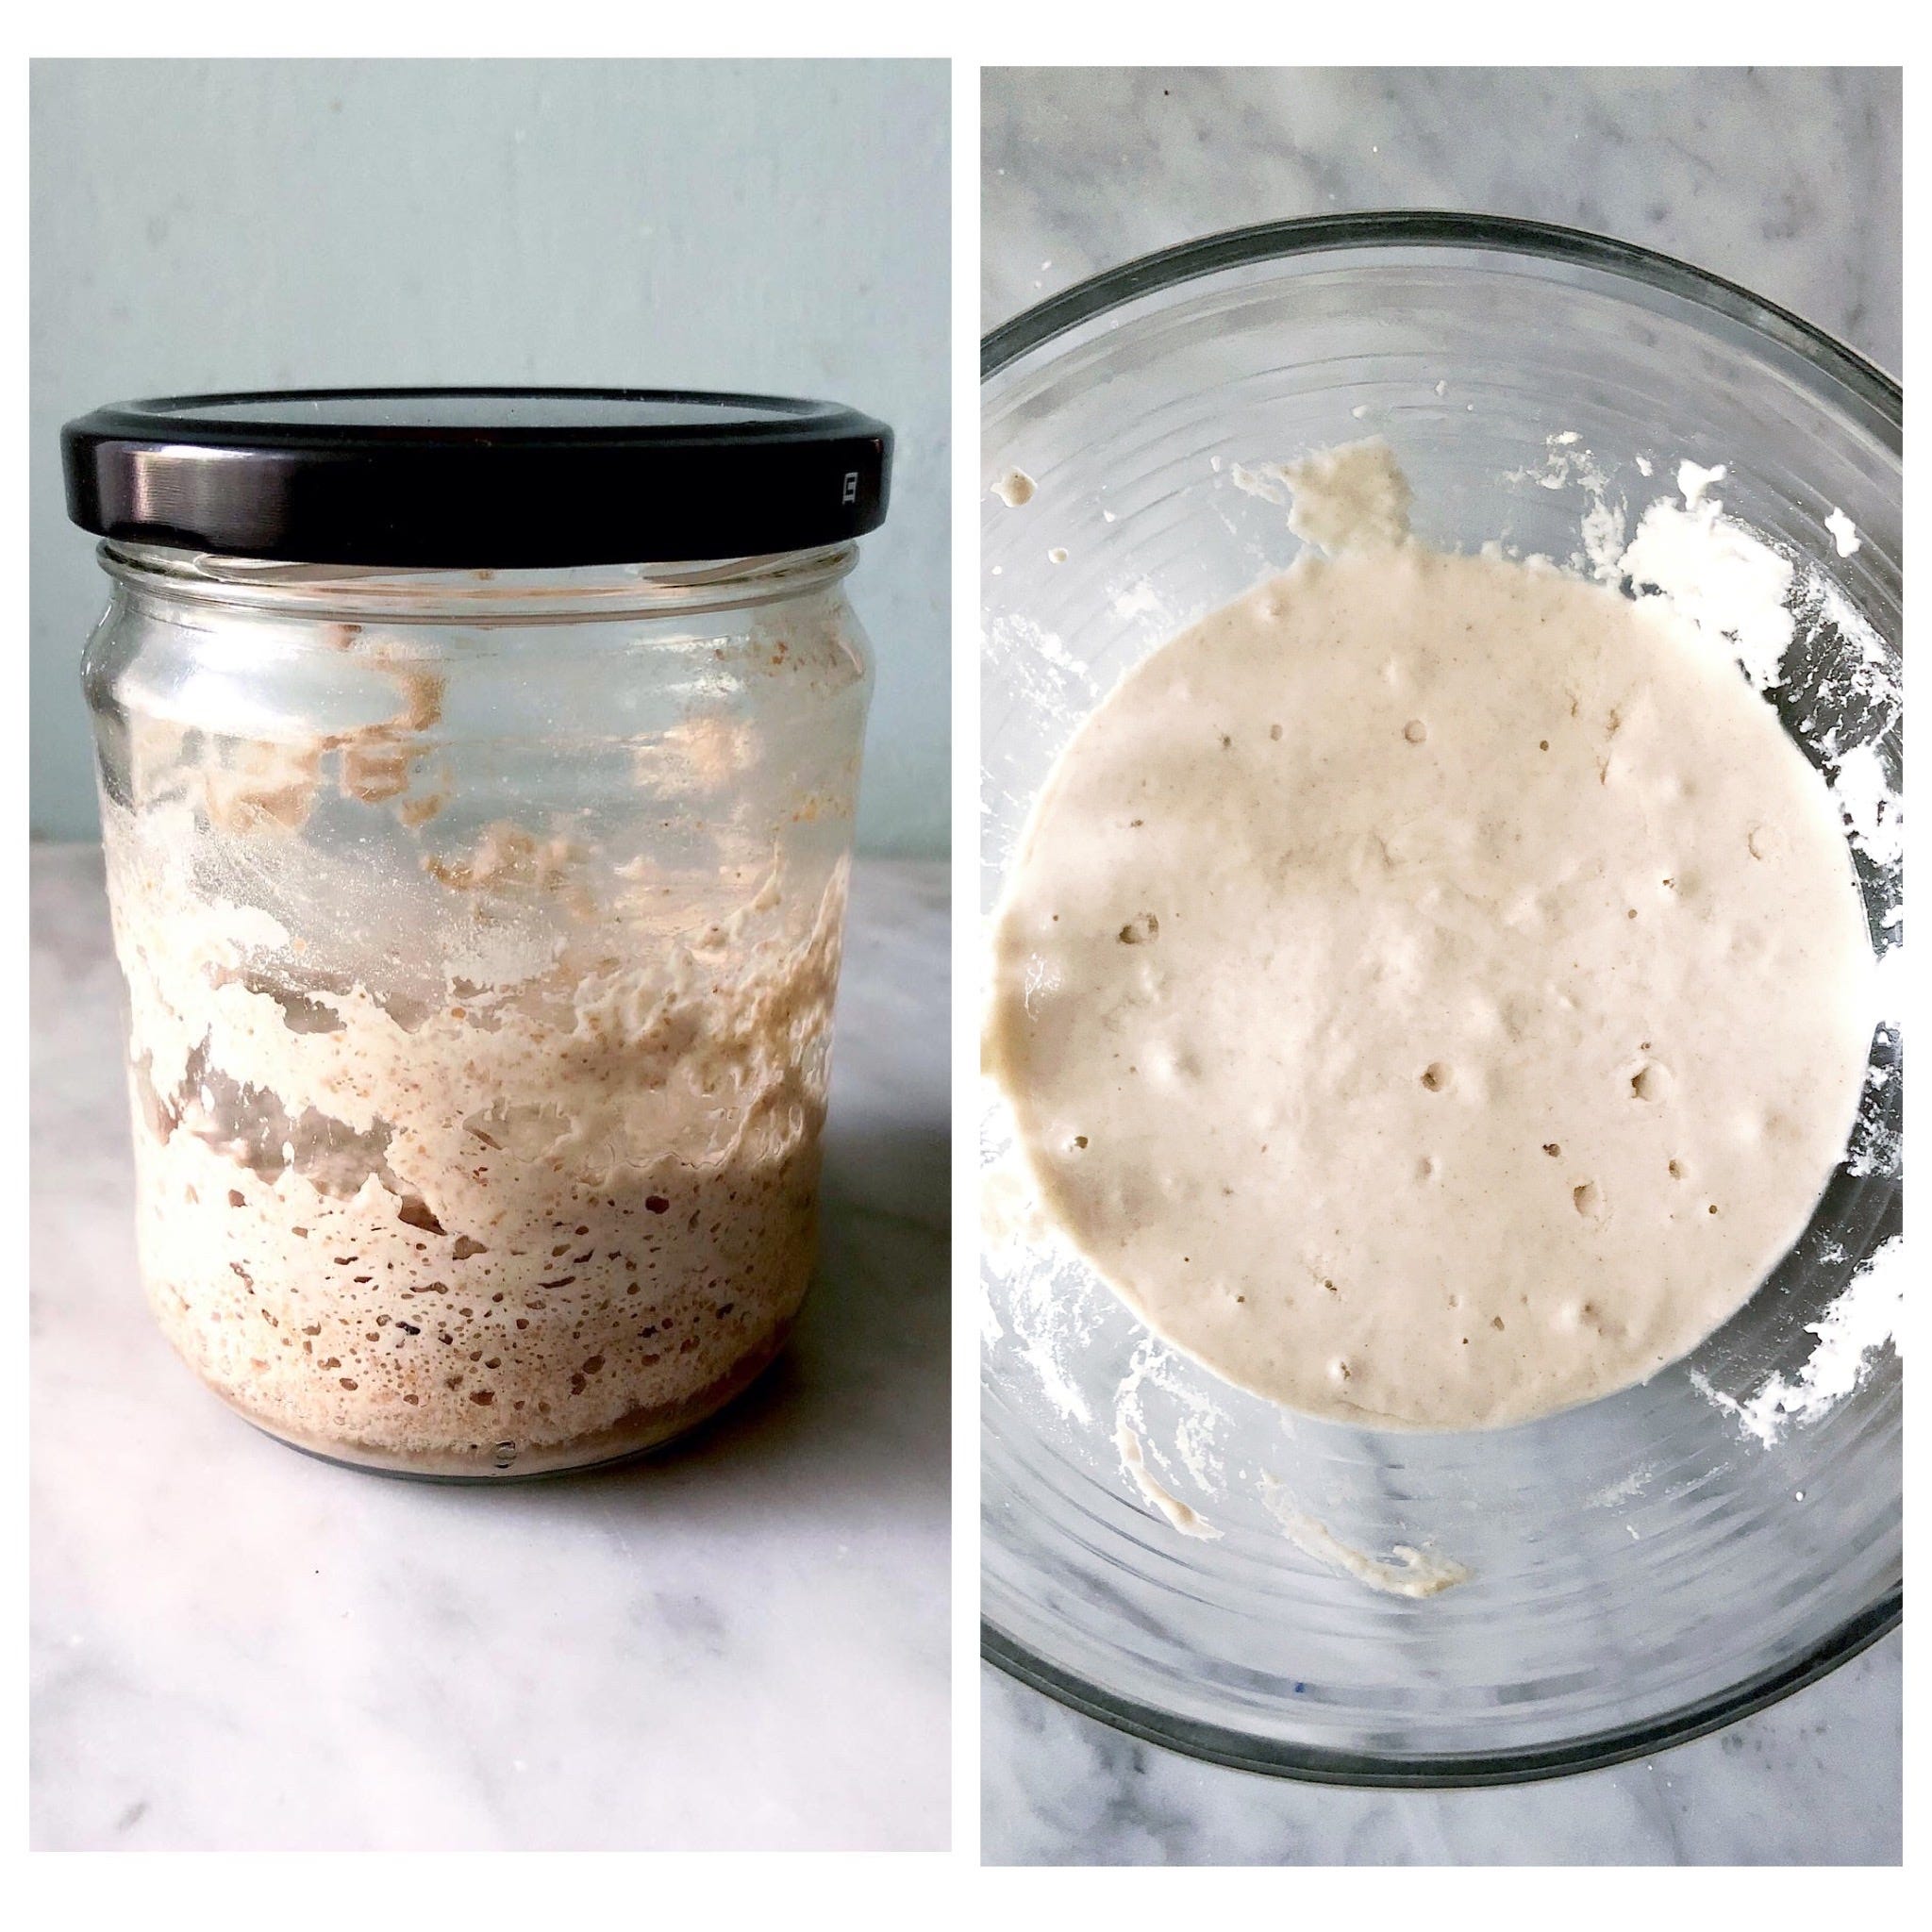
Get pre-ferment ready
On a medium-small bowl, mix the flour, water, and starter (or yeast) until well incorporated.
Let rest at least 3 to 4 hours, or overnight in the fridge *its’s ready when you drop a little in water and it floats.
Make the dough
*Stand mixer version:
Using the hook attachment, mix the flour, sugar, and yeast.
Add the pre-ferment, the milk, the water, and when everything’s incorporated add the butter, let knead for a couple of minutes and add the salt.
Knead for 3 to 5 minutes at medium speed or until the dough doesn’t stick to the bowl anymore.
*Hand-mix version:
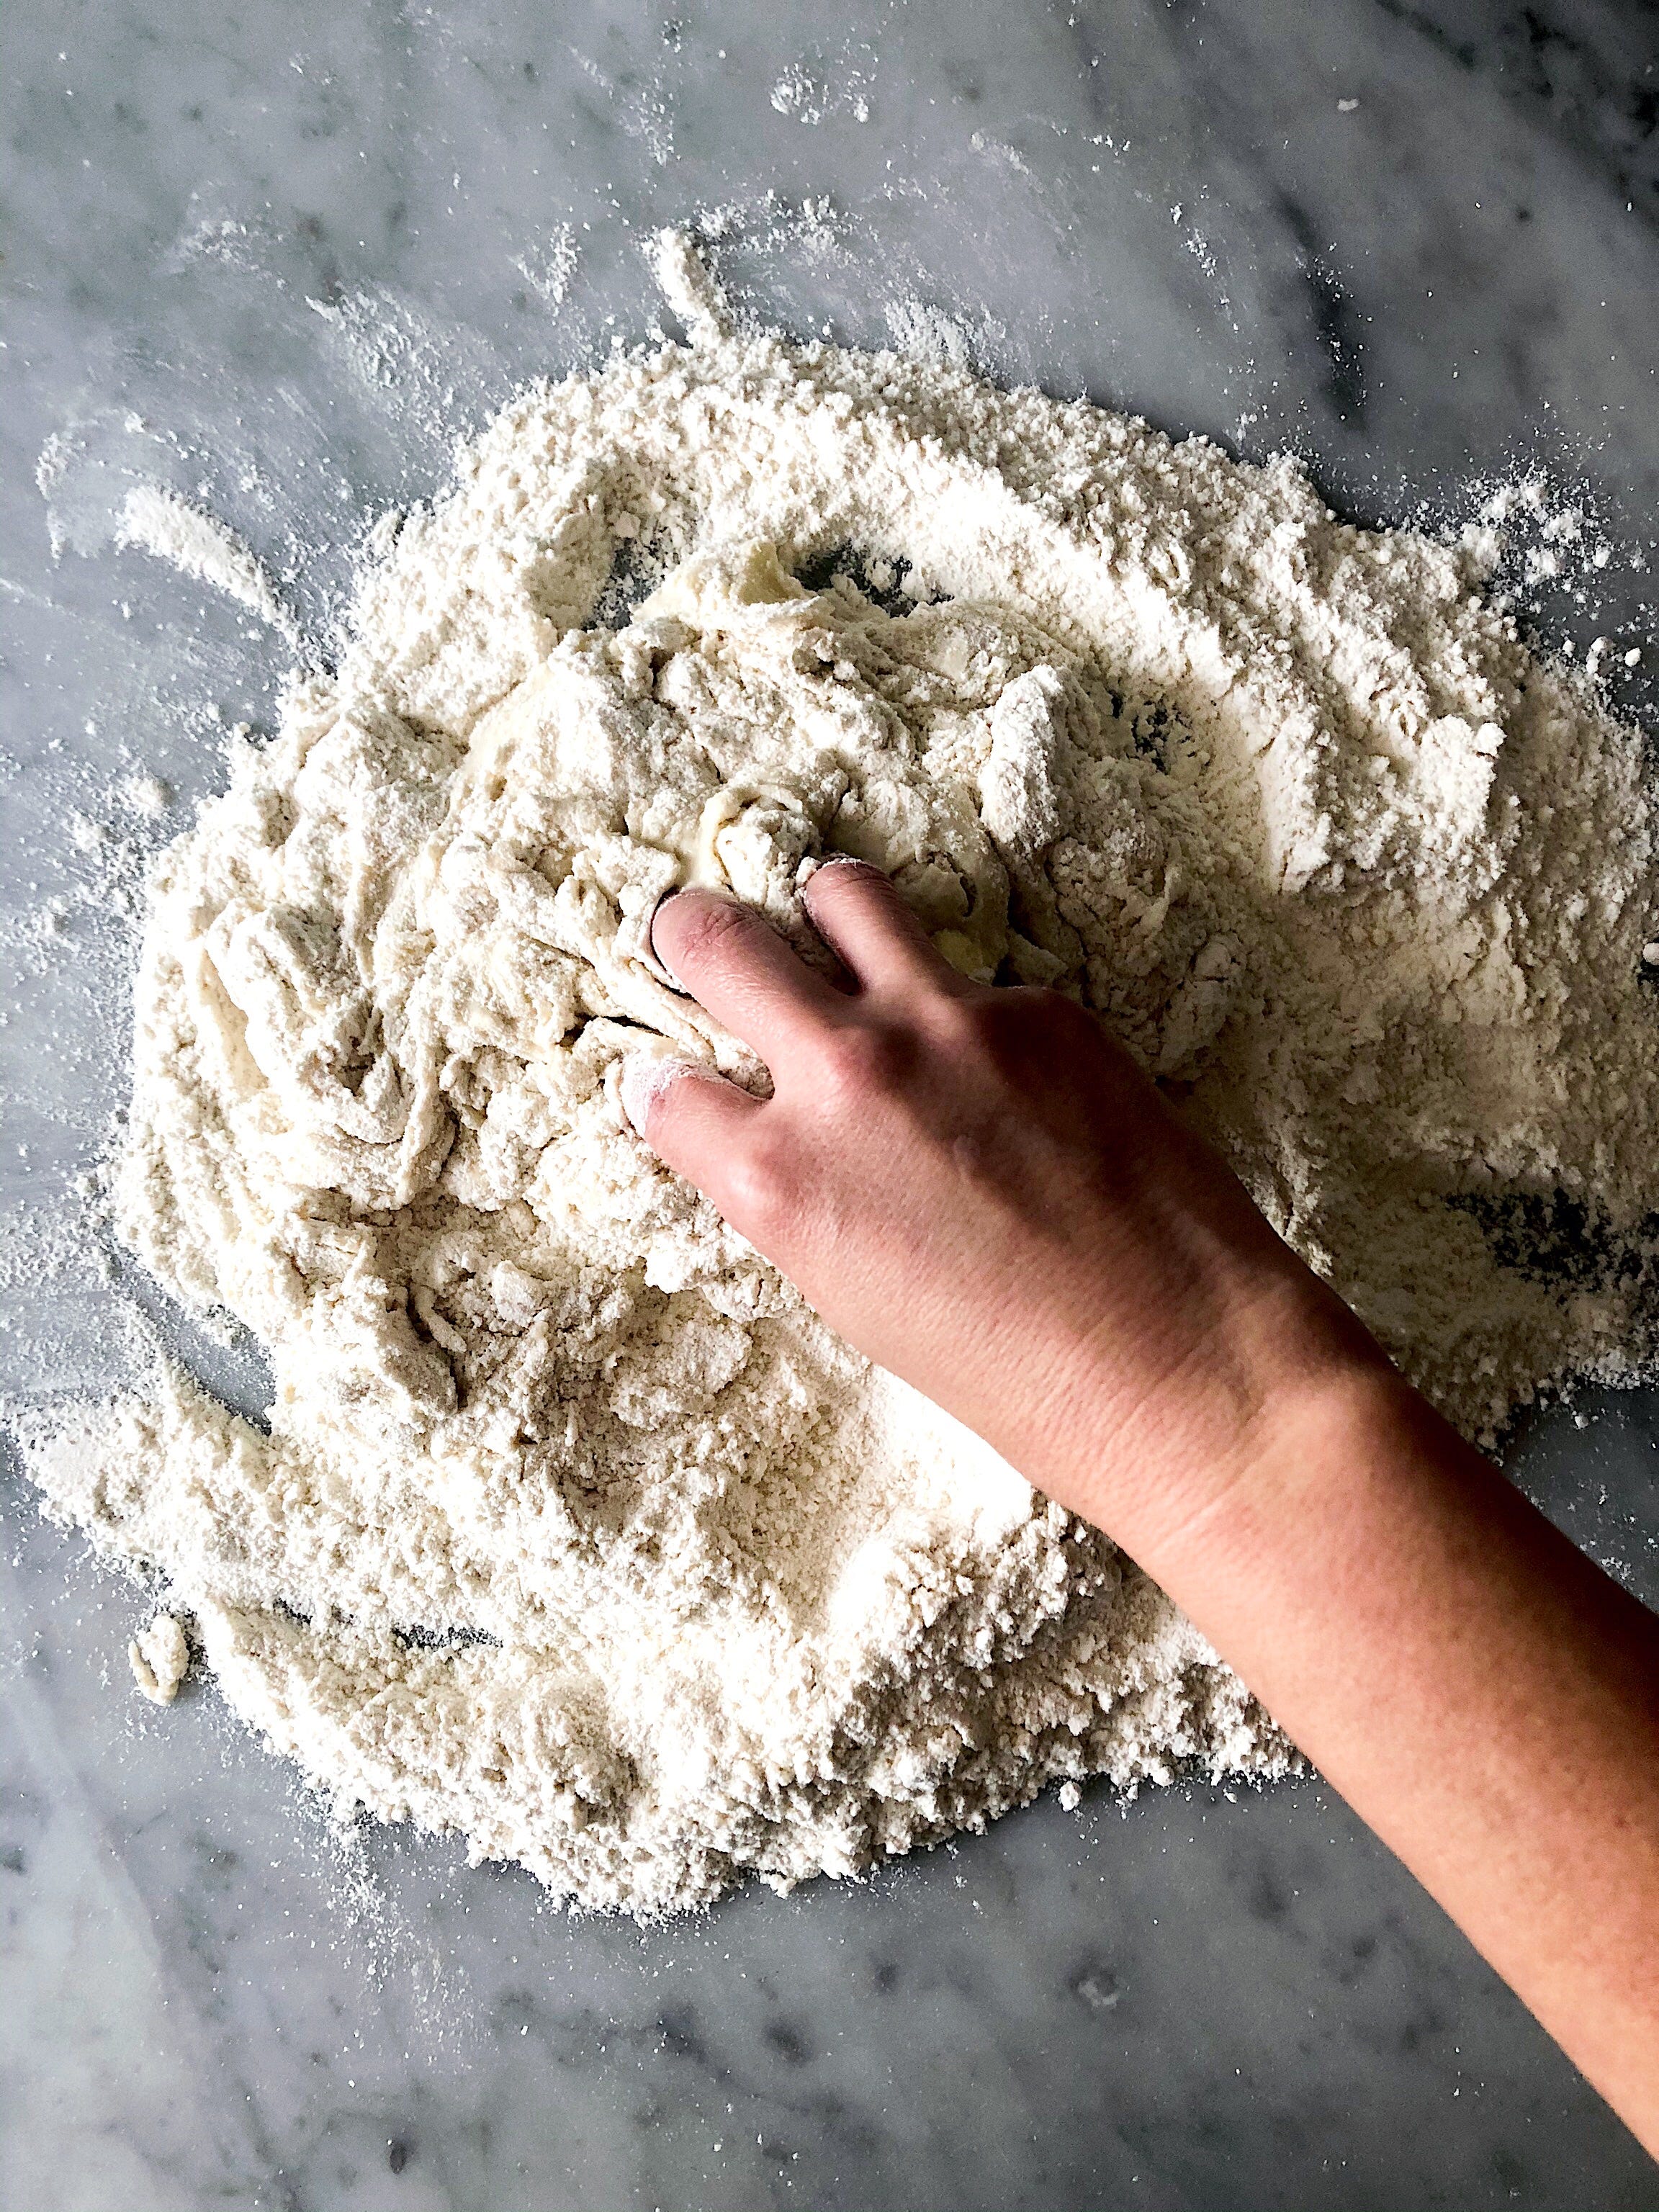
Mix the flour and sugar, and make a fountain on a clear surface.
Put the milk, the pre-fermented dough, the yeast, and the butter in the center.
Start mixing into the center, slowly pulling the flour from the sides until all everything is fully incorporated, and add the water *you might not need all of if the dough is wet enough.
Knead for a couple of minutes, and then add the salt.
Knead vigorously with both hands for five to 5 to ten minutes more, or until the dough is soft, flexible, and it does not stick to the surface.
Here’s a video…
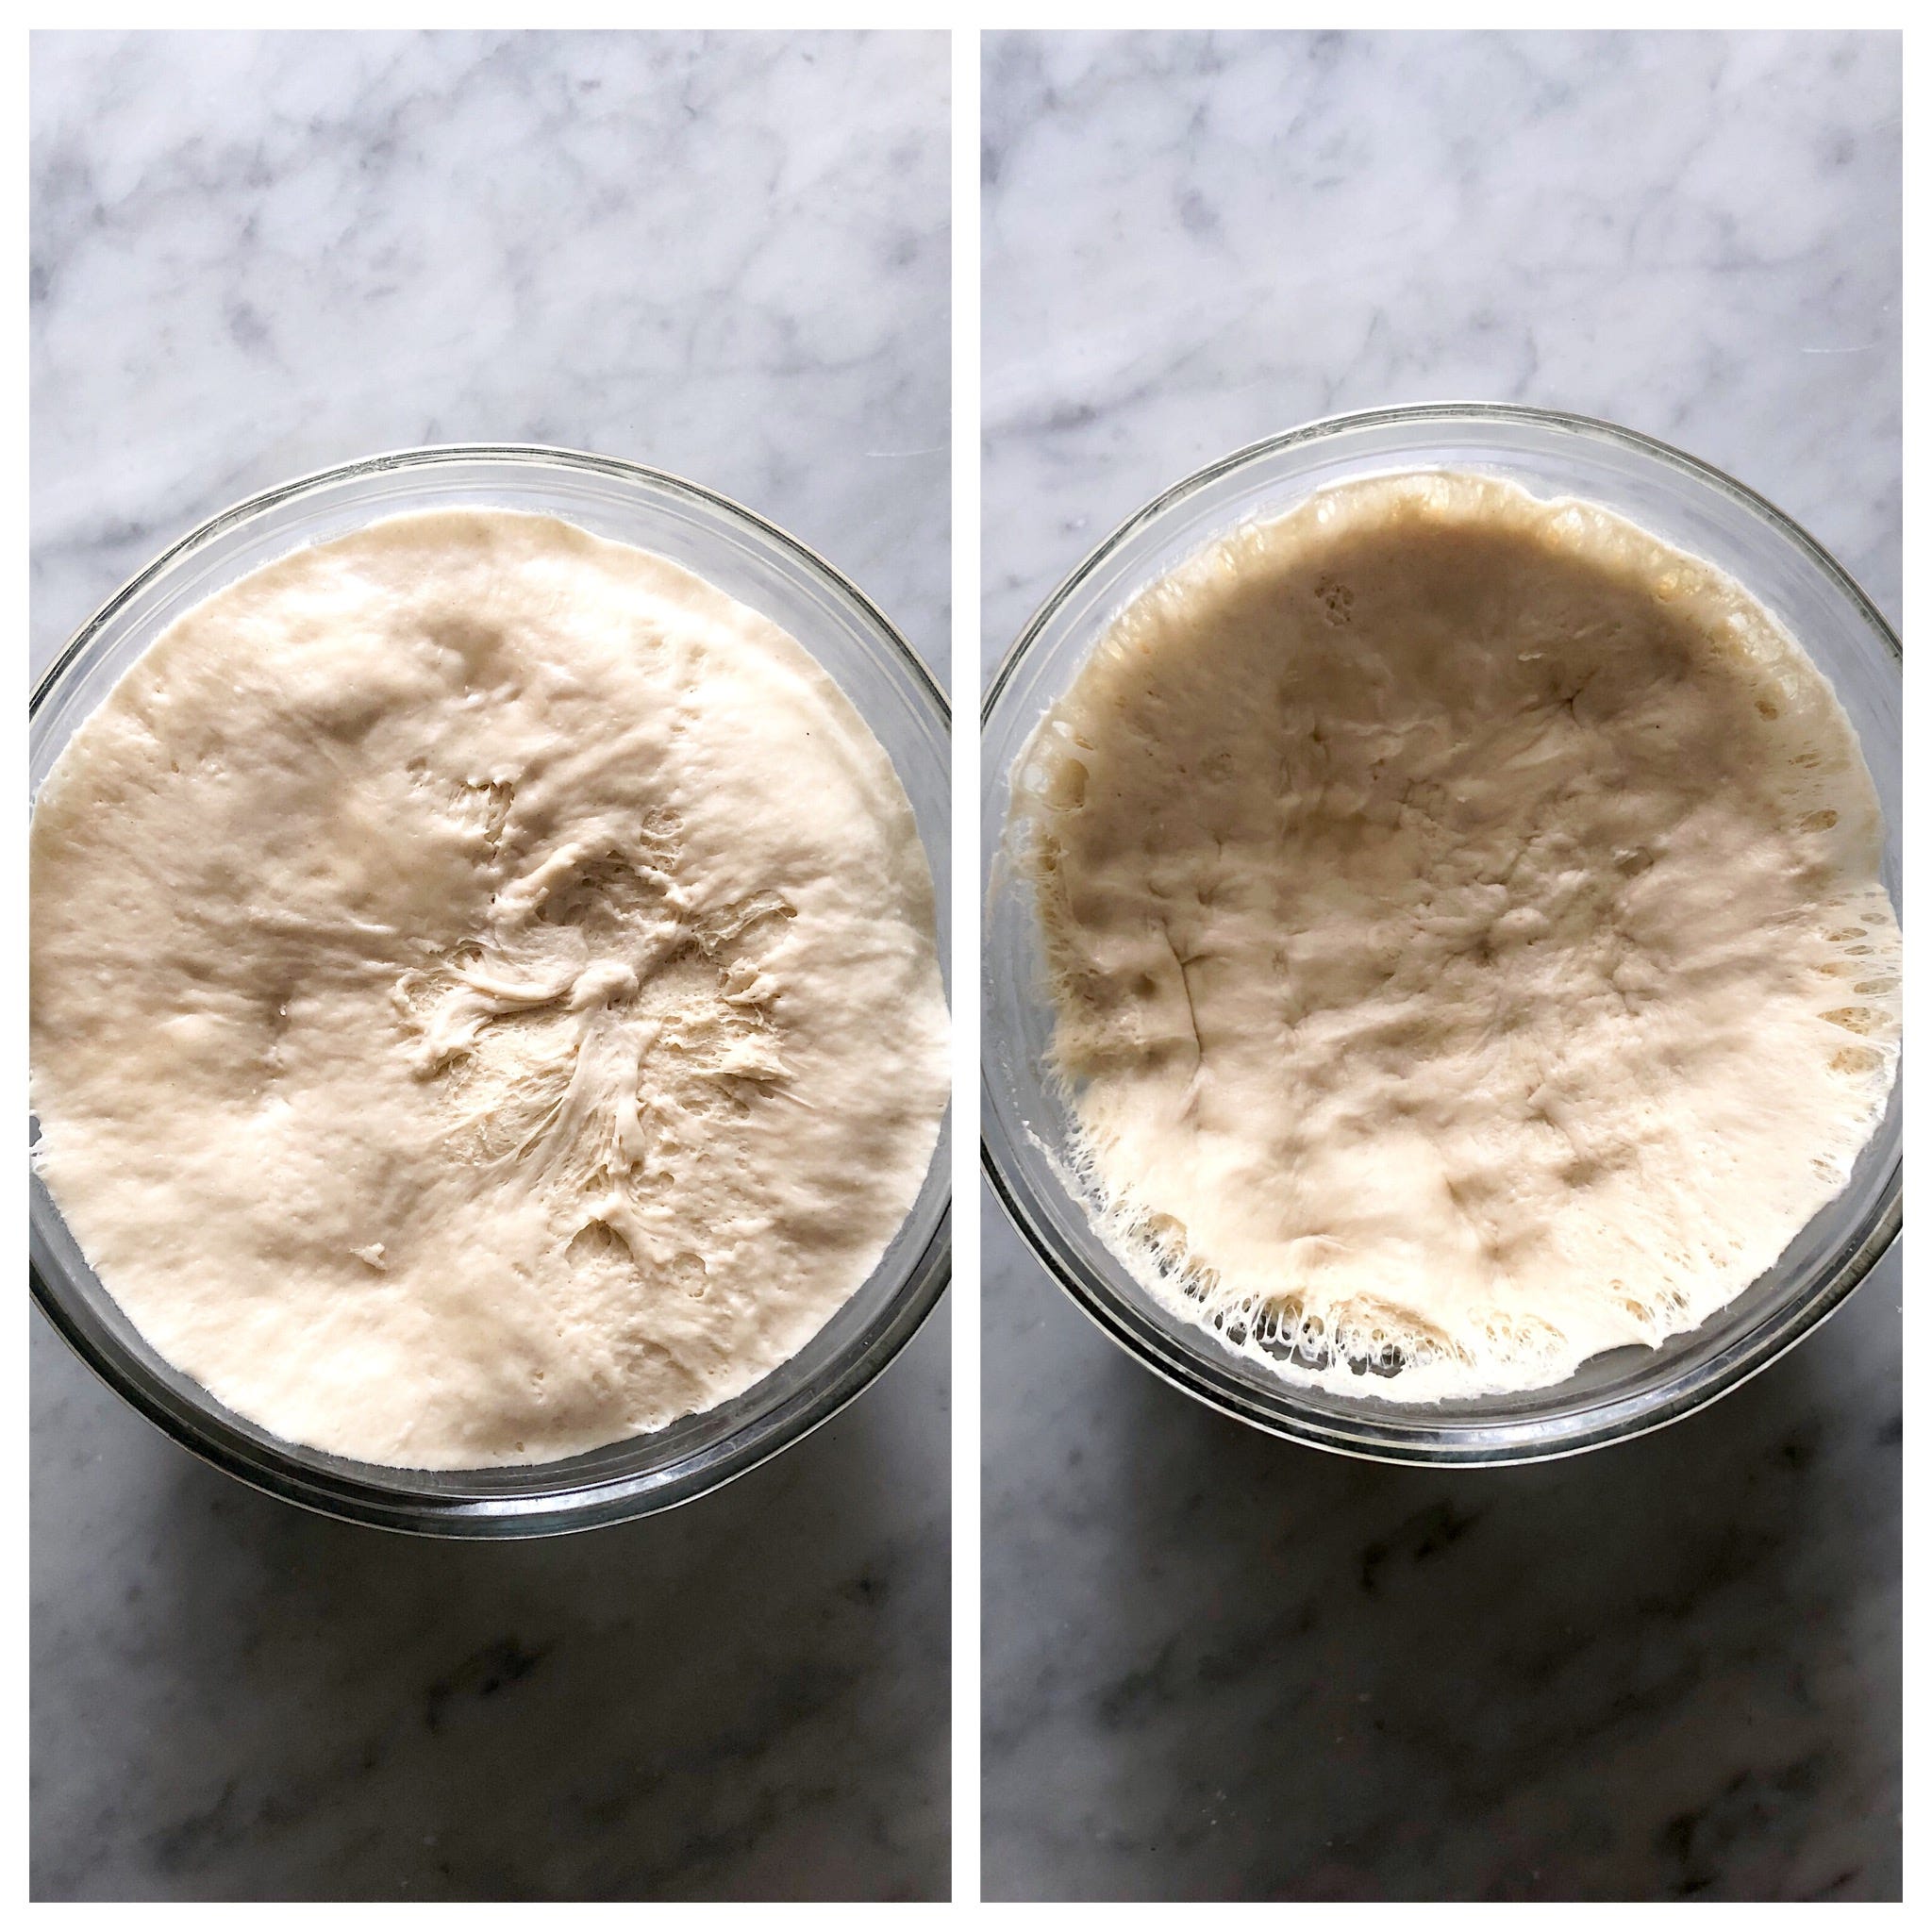
Rest
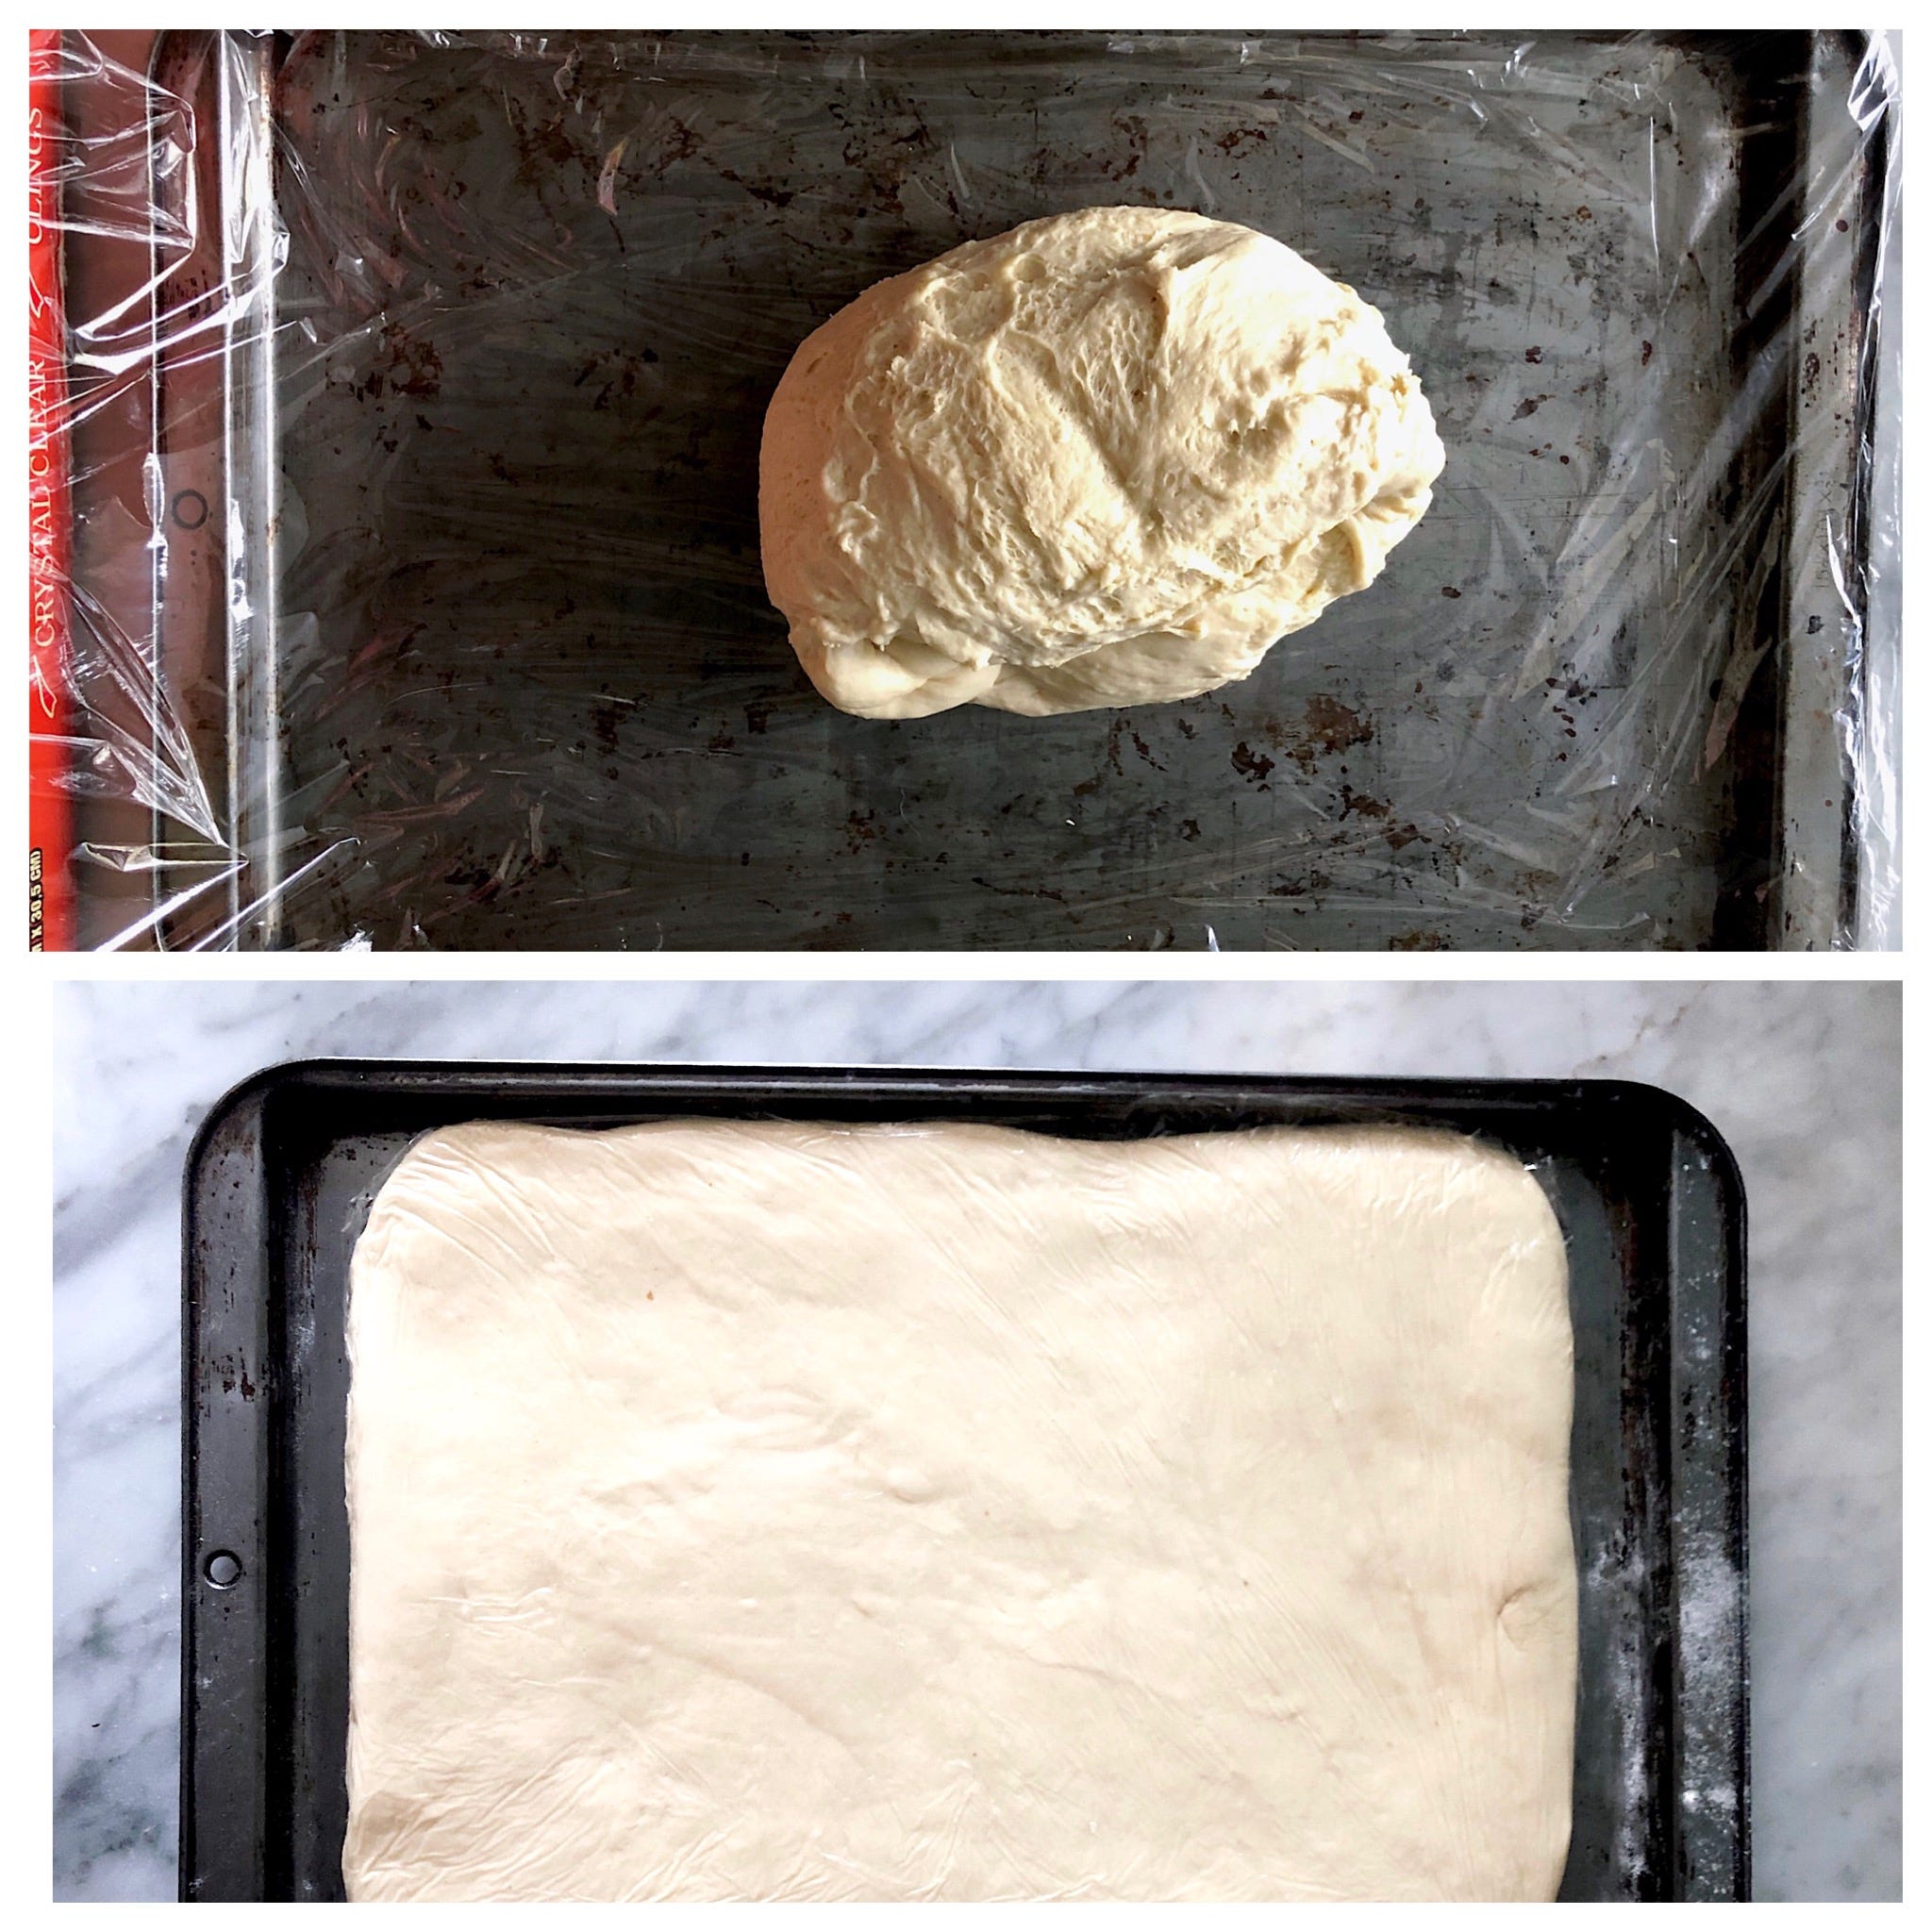
Transfer the dough into a bowl; cover it with a damp towel or plastic wrap, and leave to rest for 1 to 2 hours or until the dough doubles in size.
Punch the dough to release the air.
Put the dough on a tray with plastic wrap and shape into the form of a triangle of approximately 24 x 32 centimeters, with the help of the rolling pin and/or with your hands.
Cover with plastic wrap put on a plain surface, and leave in the freezer to chill for 25 to 30 minutes.
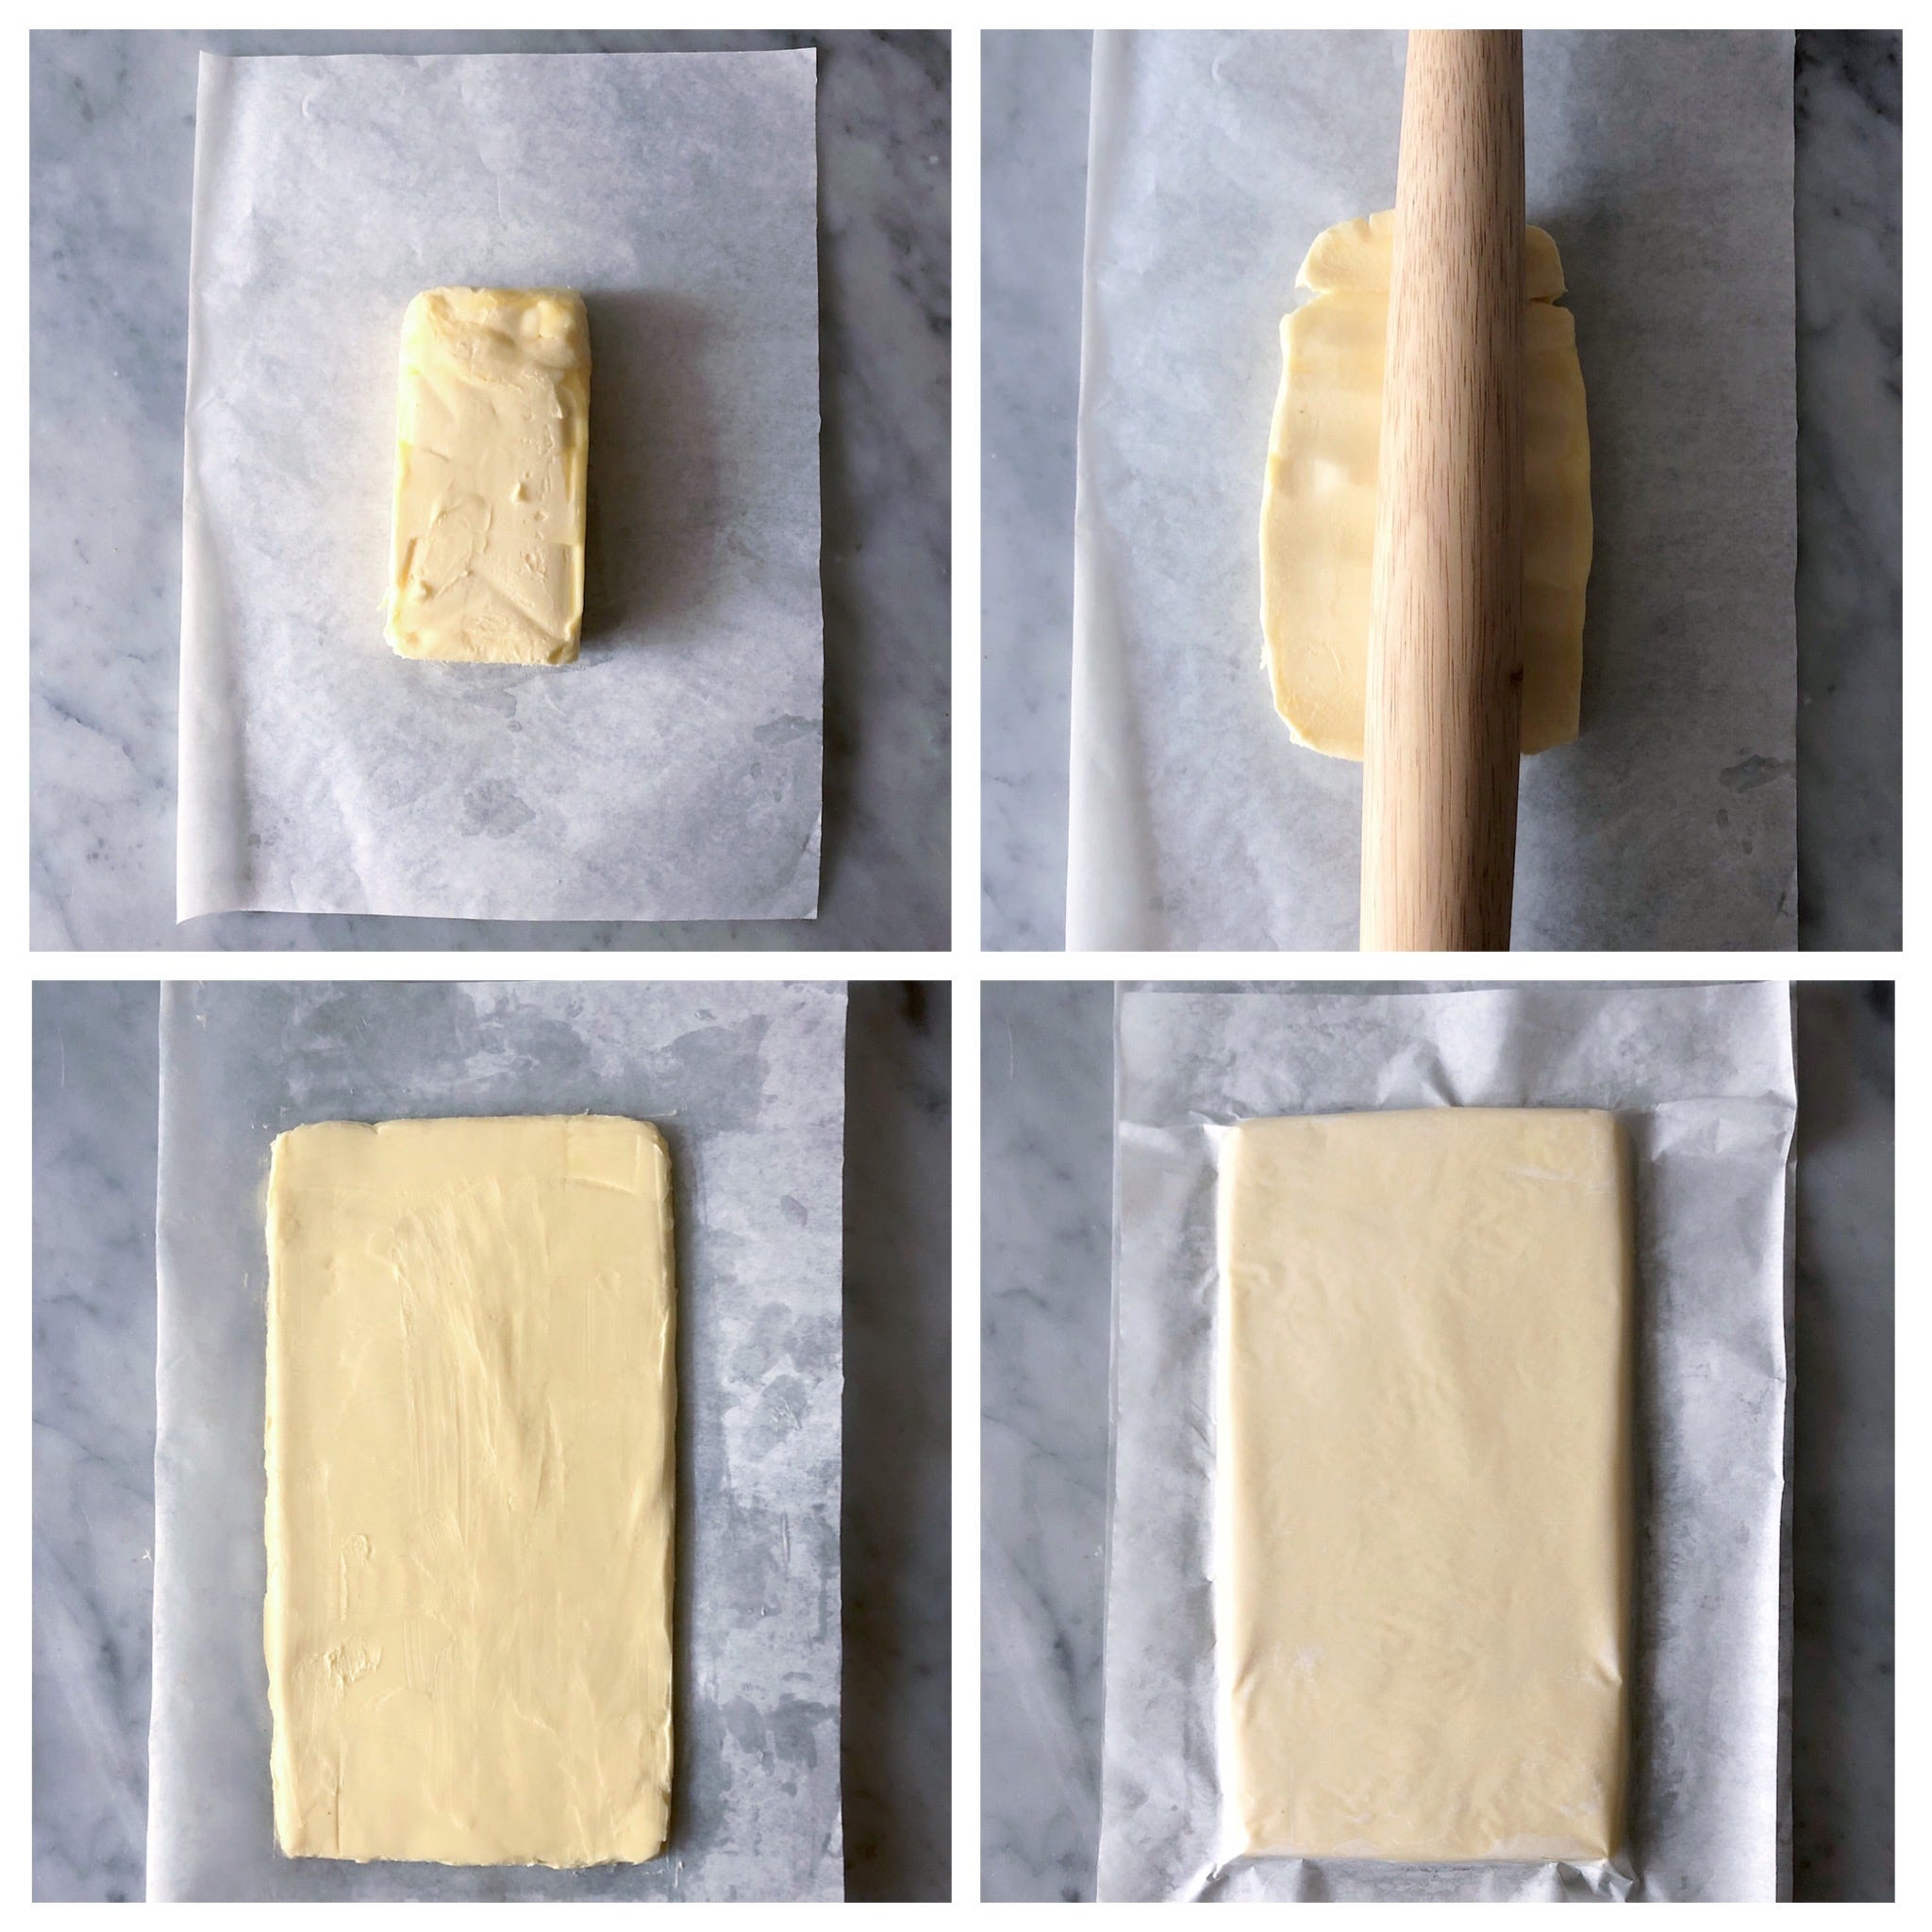
Make butter block
Put the butter over a sheet of parchment paper (if it’s too cold leave at room temperature for a while until it softens a little), and pound it carefully with the rolling pin until it spreads out.
Then, with the help of a scraper or a spatula, form a rectangle of 22 x 16 centimeters.
Cover with another piece of paper, and leave on the refrigerator to chill. When you’re ready to start laminating, remember to rest the block at room temperature for a couple of minutes before you use it; it needs to be firm but flexible so that it does not break into pieces when you roll it.
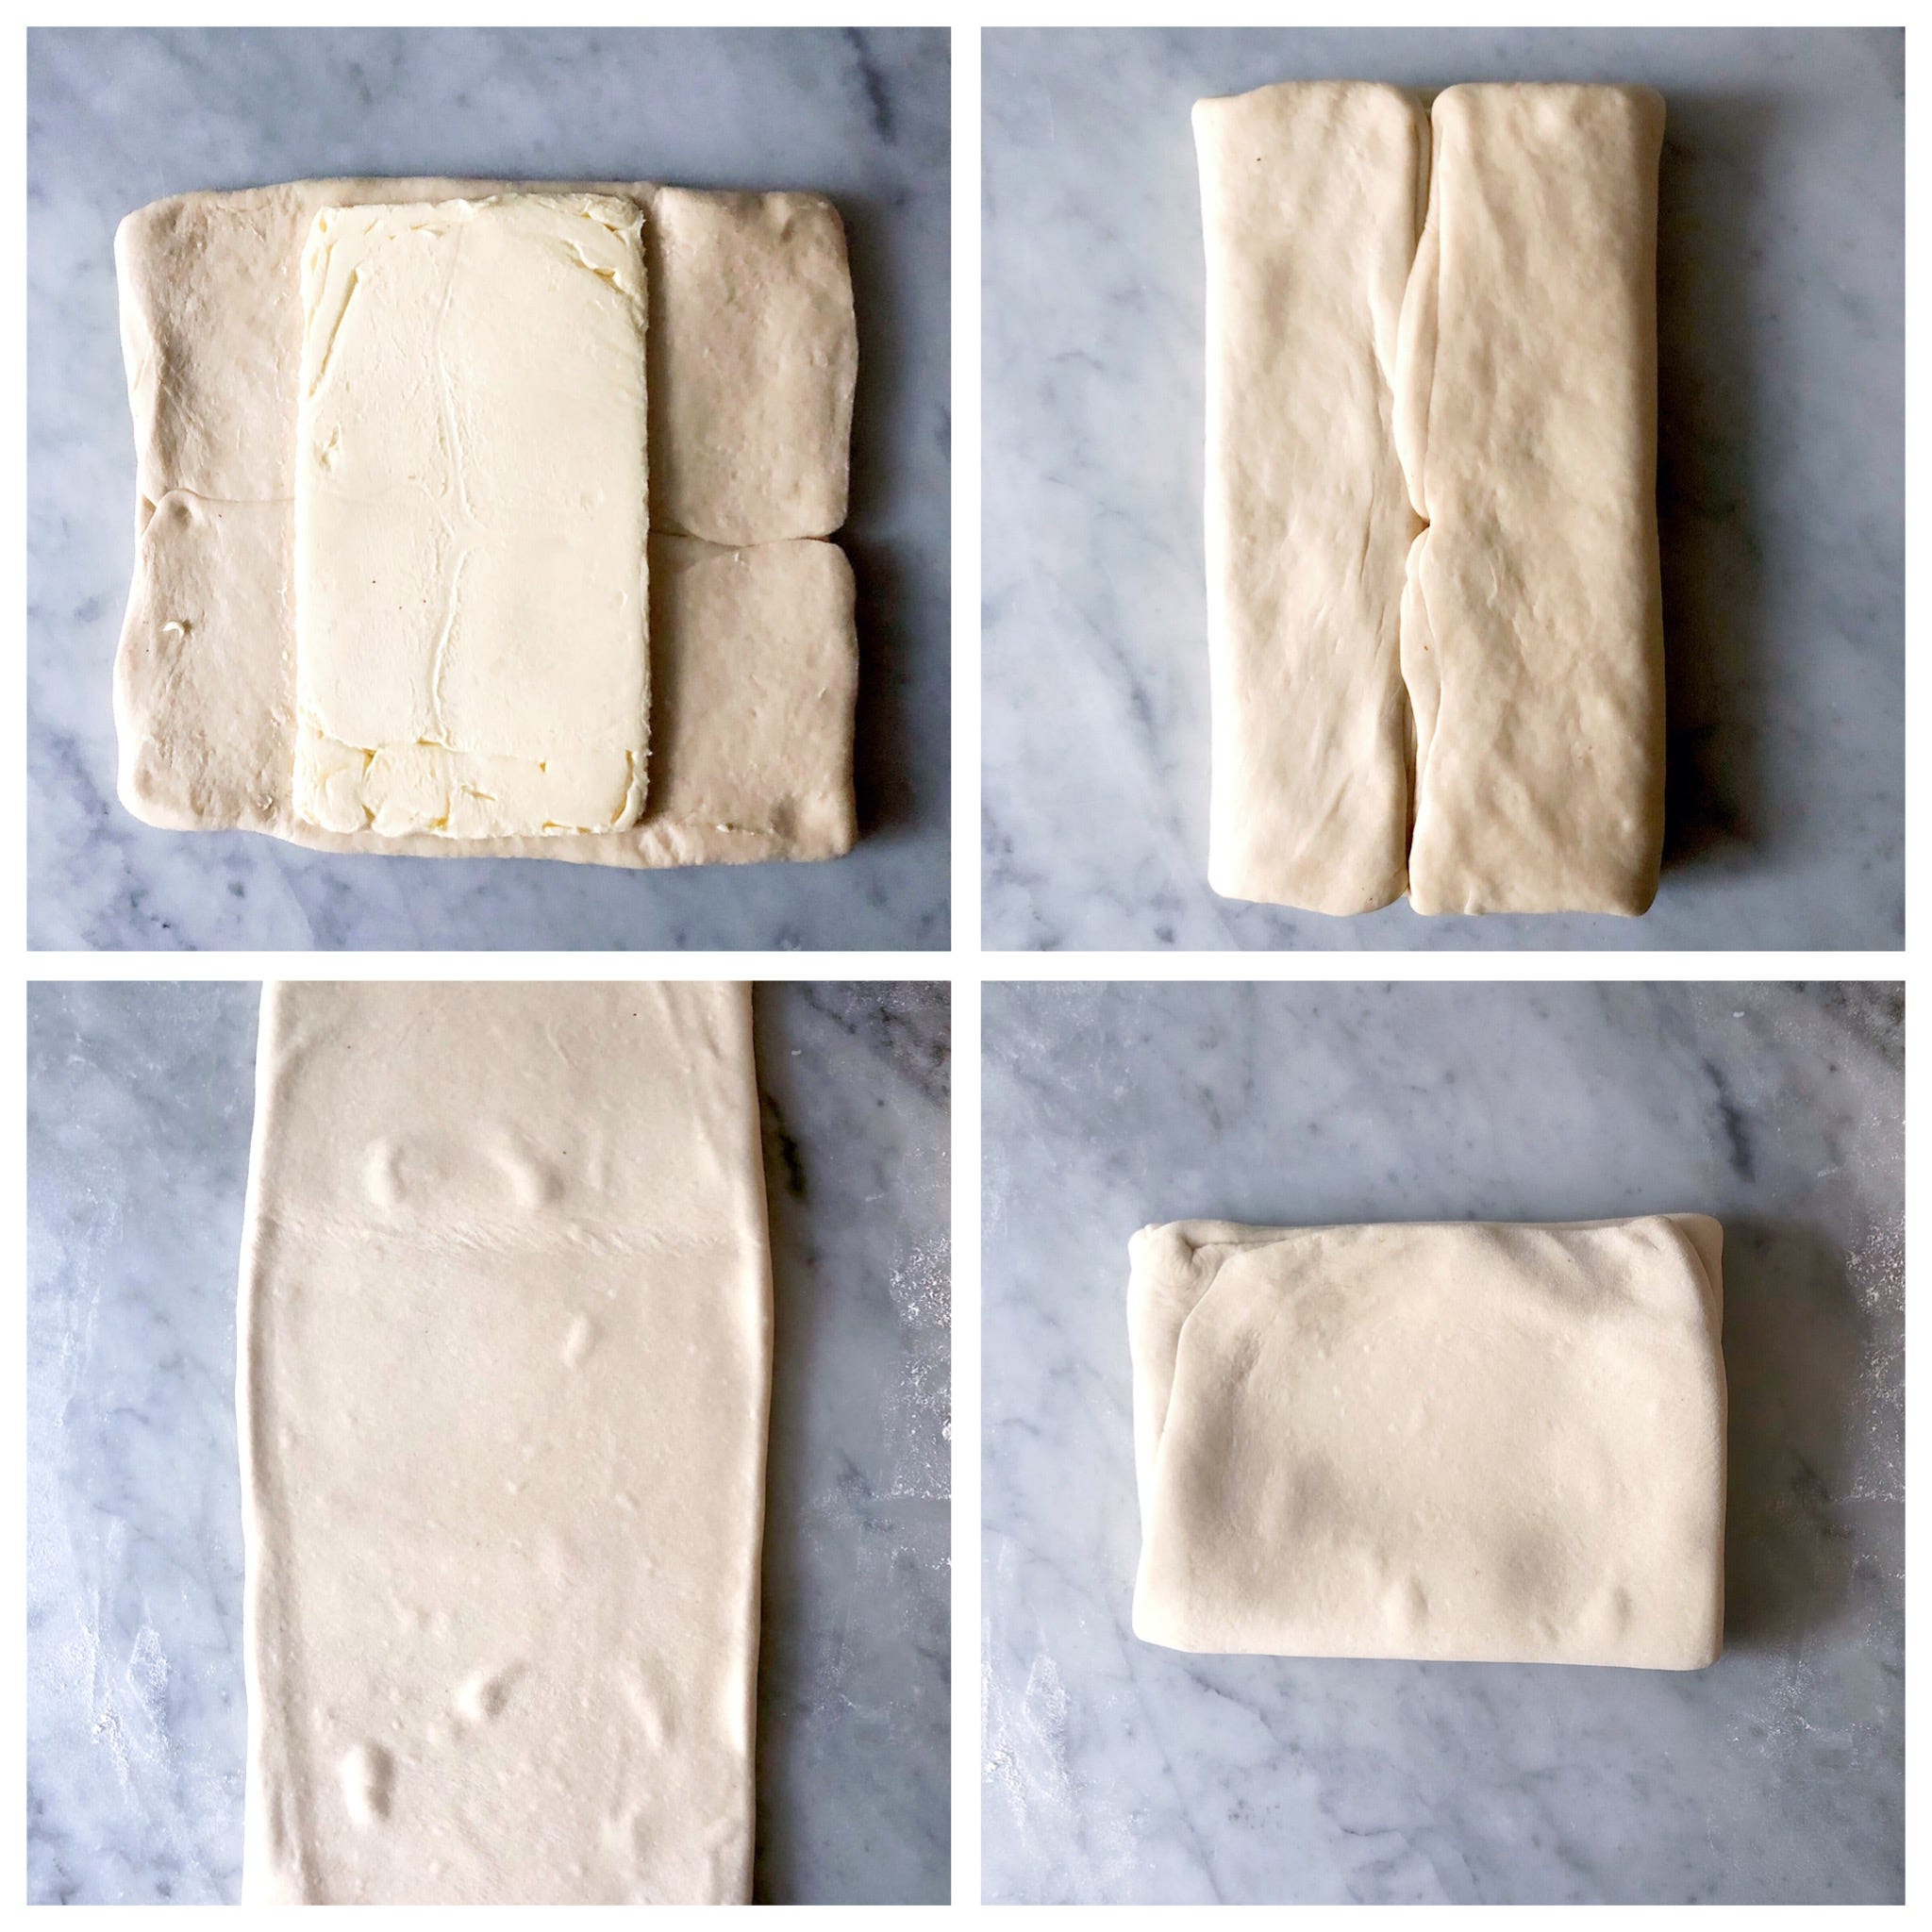
Lock-in and Laminate – first two folds
Take the dough out of the fridge, transfer into a lightly floured surface, and position it horizontally.
Release the paper from the butter block and put it in the middle of the rectangle.
Fold both sides to the middle, so that they cover the dough completely.
Press the edges together so that the butter stays inside.
Roll the dough in direction of the to the open sides until rectangle almost triples in size.
Fold the dough in three: putting the first third over the second, and the last third on top.
Roll the dough again, and repeat the operation.
Cover the dough folded with the plastic and let it relax 20 minutes on the freezer.
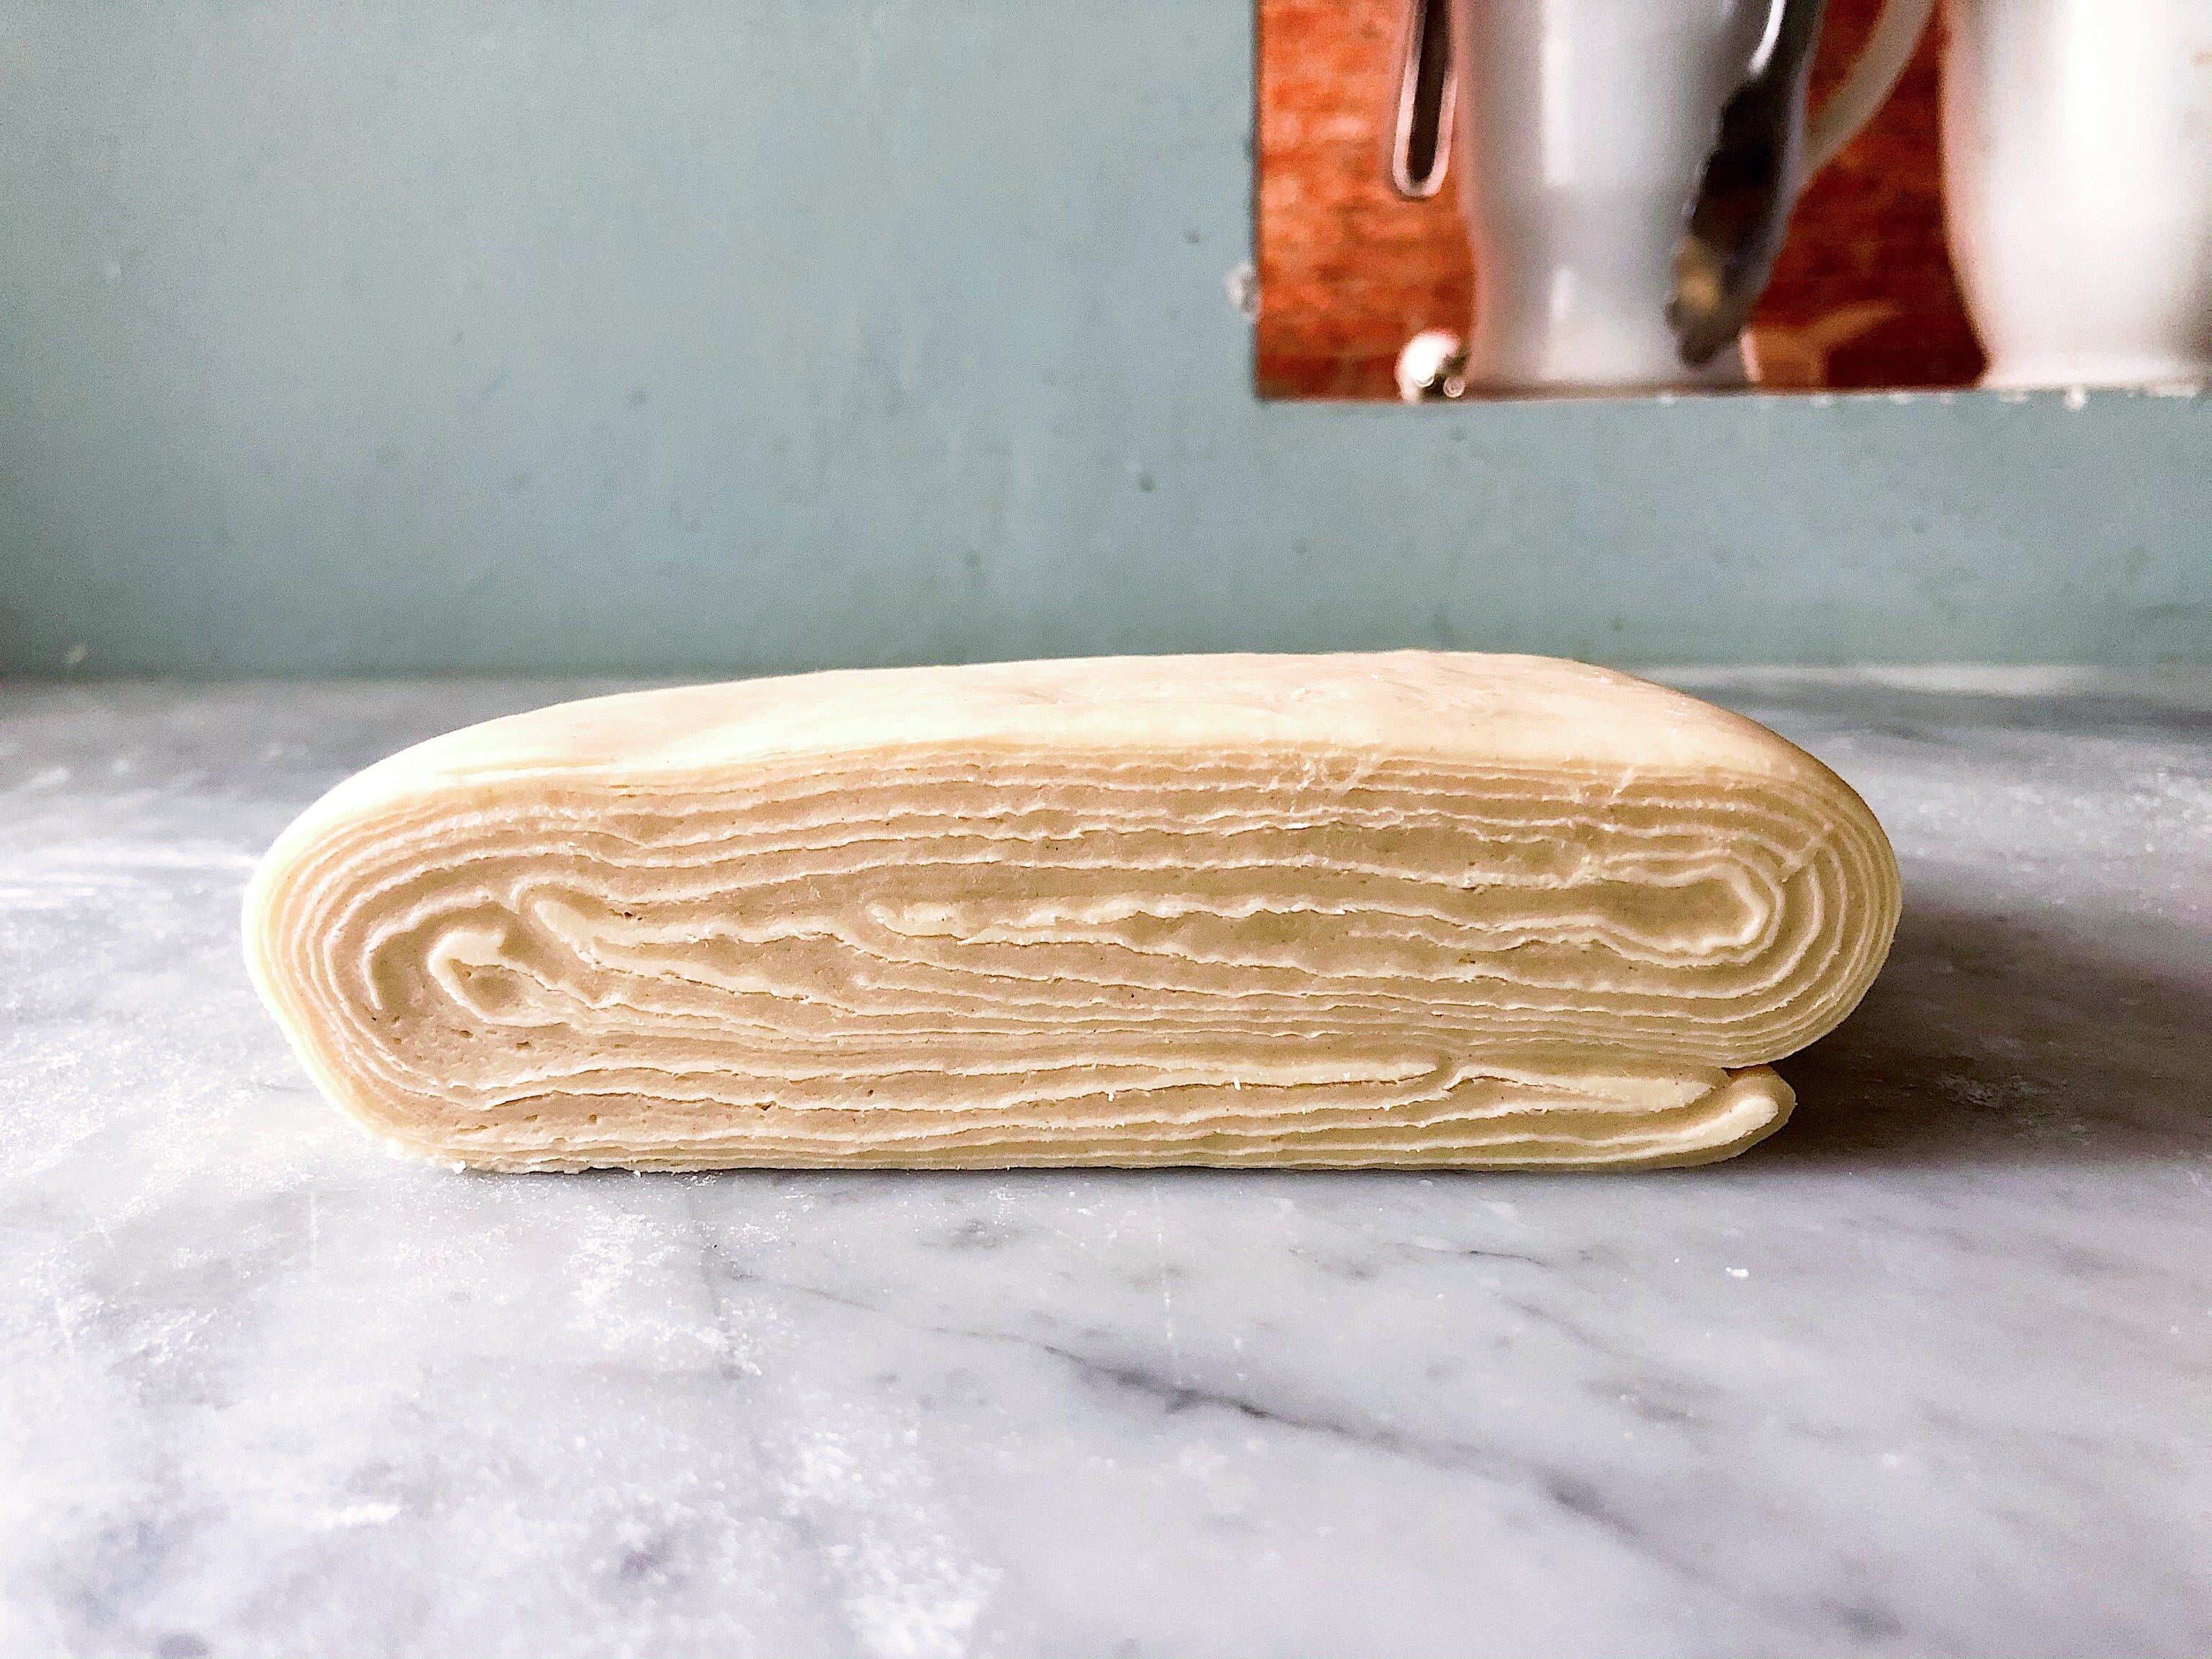
Laminate – second round of folds
Repeat the folding process two more times.
When you finish, cut the final folded dough in half (measure it to have same size pieces), so you can work in two batches
Cover individually with plastic wrap, and let rest on the freezer another 20 minutes if you are going to use it right away. *You can keep it in the freezer for up to a month.
GUAVA ROLLS
Shape
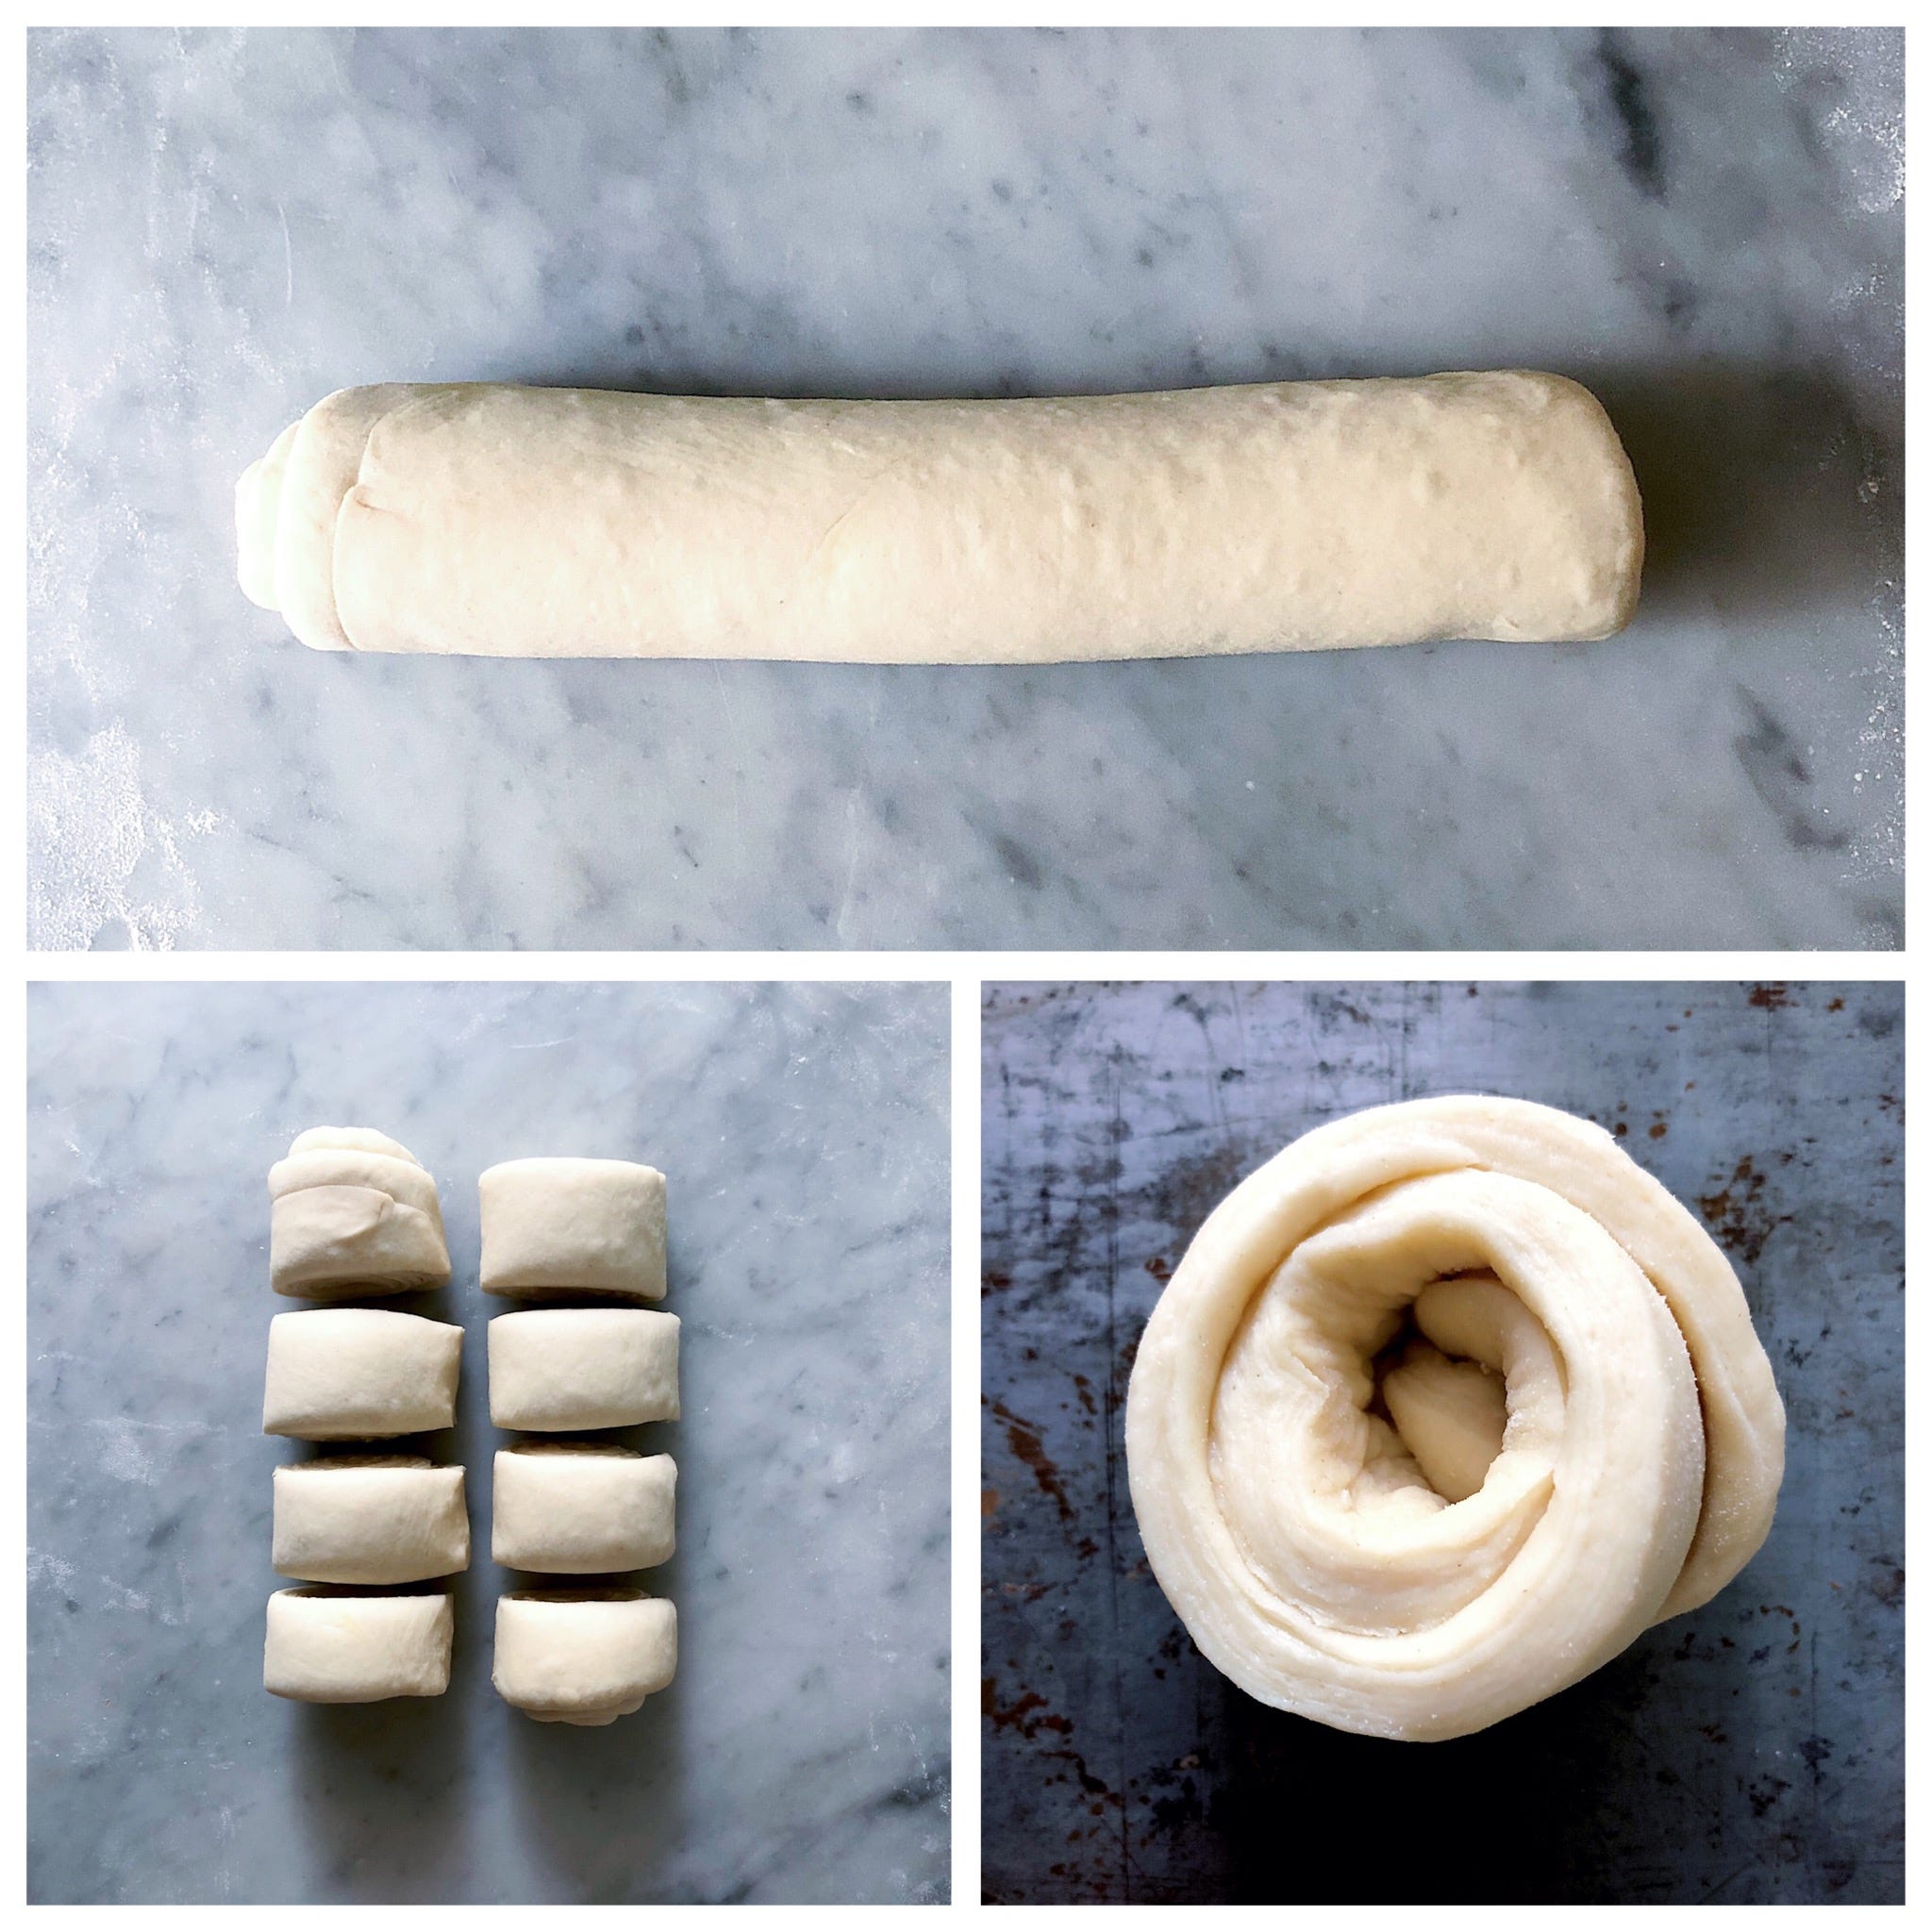
Flour the working surface and roll it into a rectangle of 30 x 12 centimeters.
Delicately cut the edges of the dough all around to open the seams.
Place the rectangle it horizontally, roll, and cut into 2 cm pieces.
Unroll the stripes, put three fingers together, and roll the dough around them, kind of if like you were rolling the cable of your cell phone charger, and then secure the end inside.
Place the rolls, end side down, on a tray covered with parchment paper.
Coat the rolls with the egg wash (you can add a dash of water or milk to the beaten egg soften it), taking care not to cover the laminated ends, so that the rolls can leaven properly.
Leave to rest at least 2 hours (on a warm place) or until the rolls make a gelatinous movement if you shake the tray.
Make the fillings
*Guava marmalade
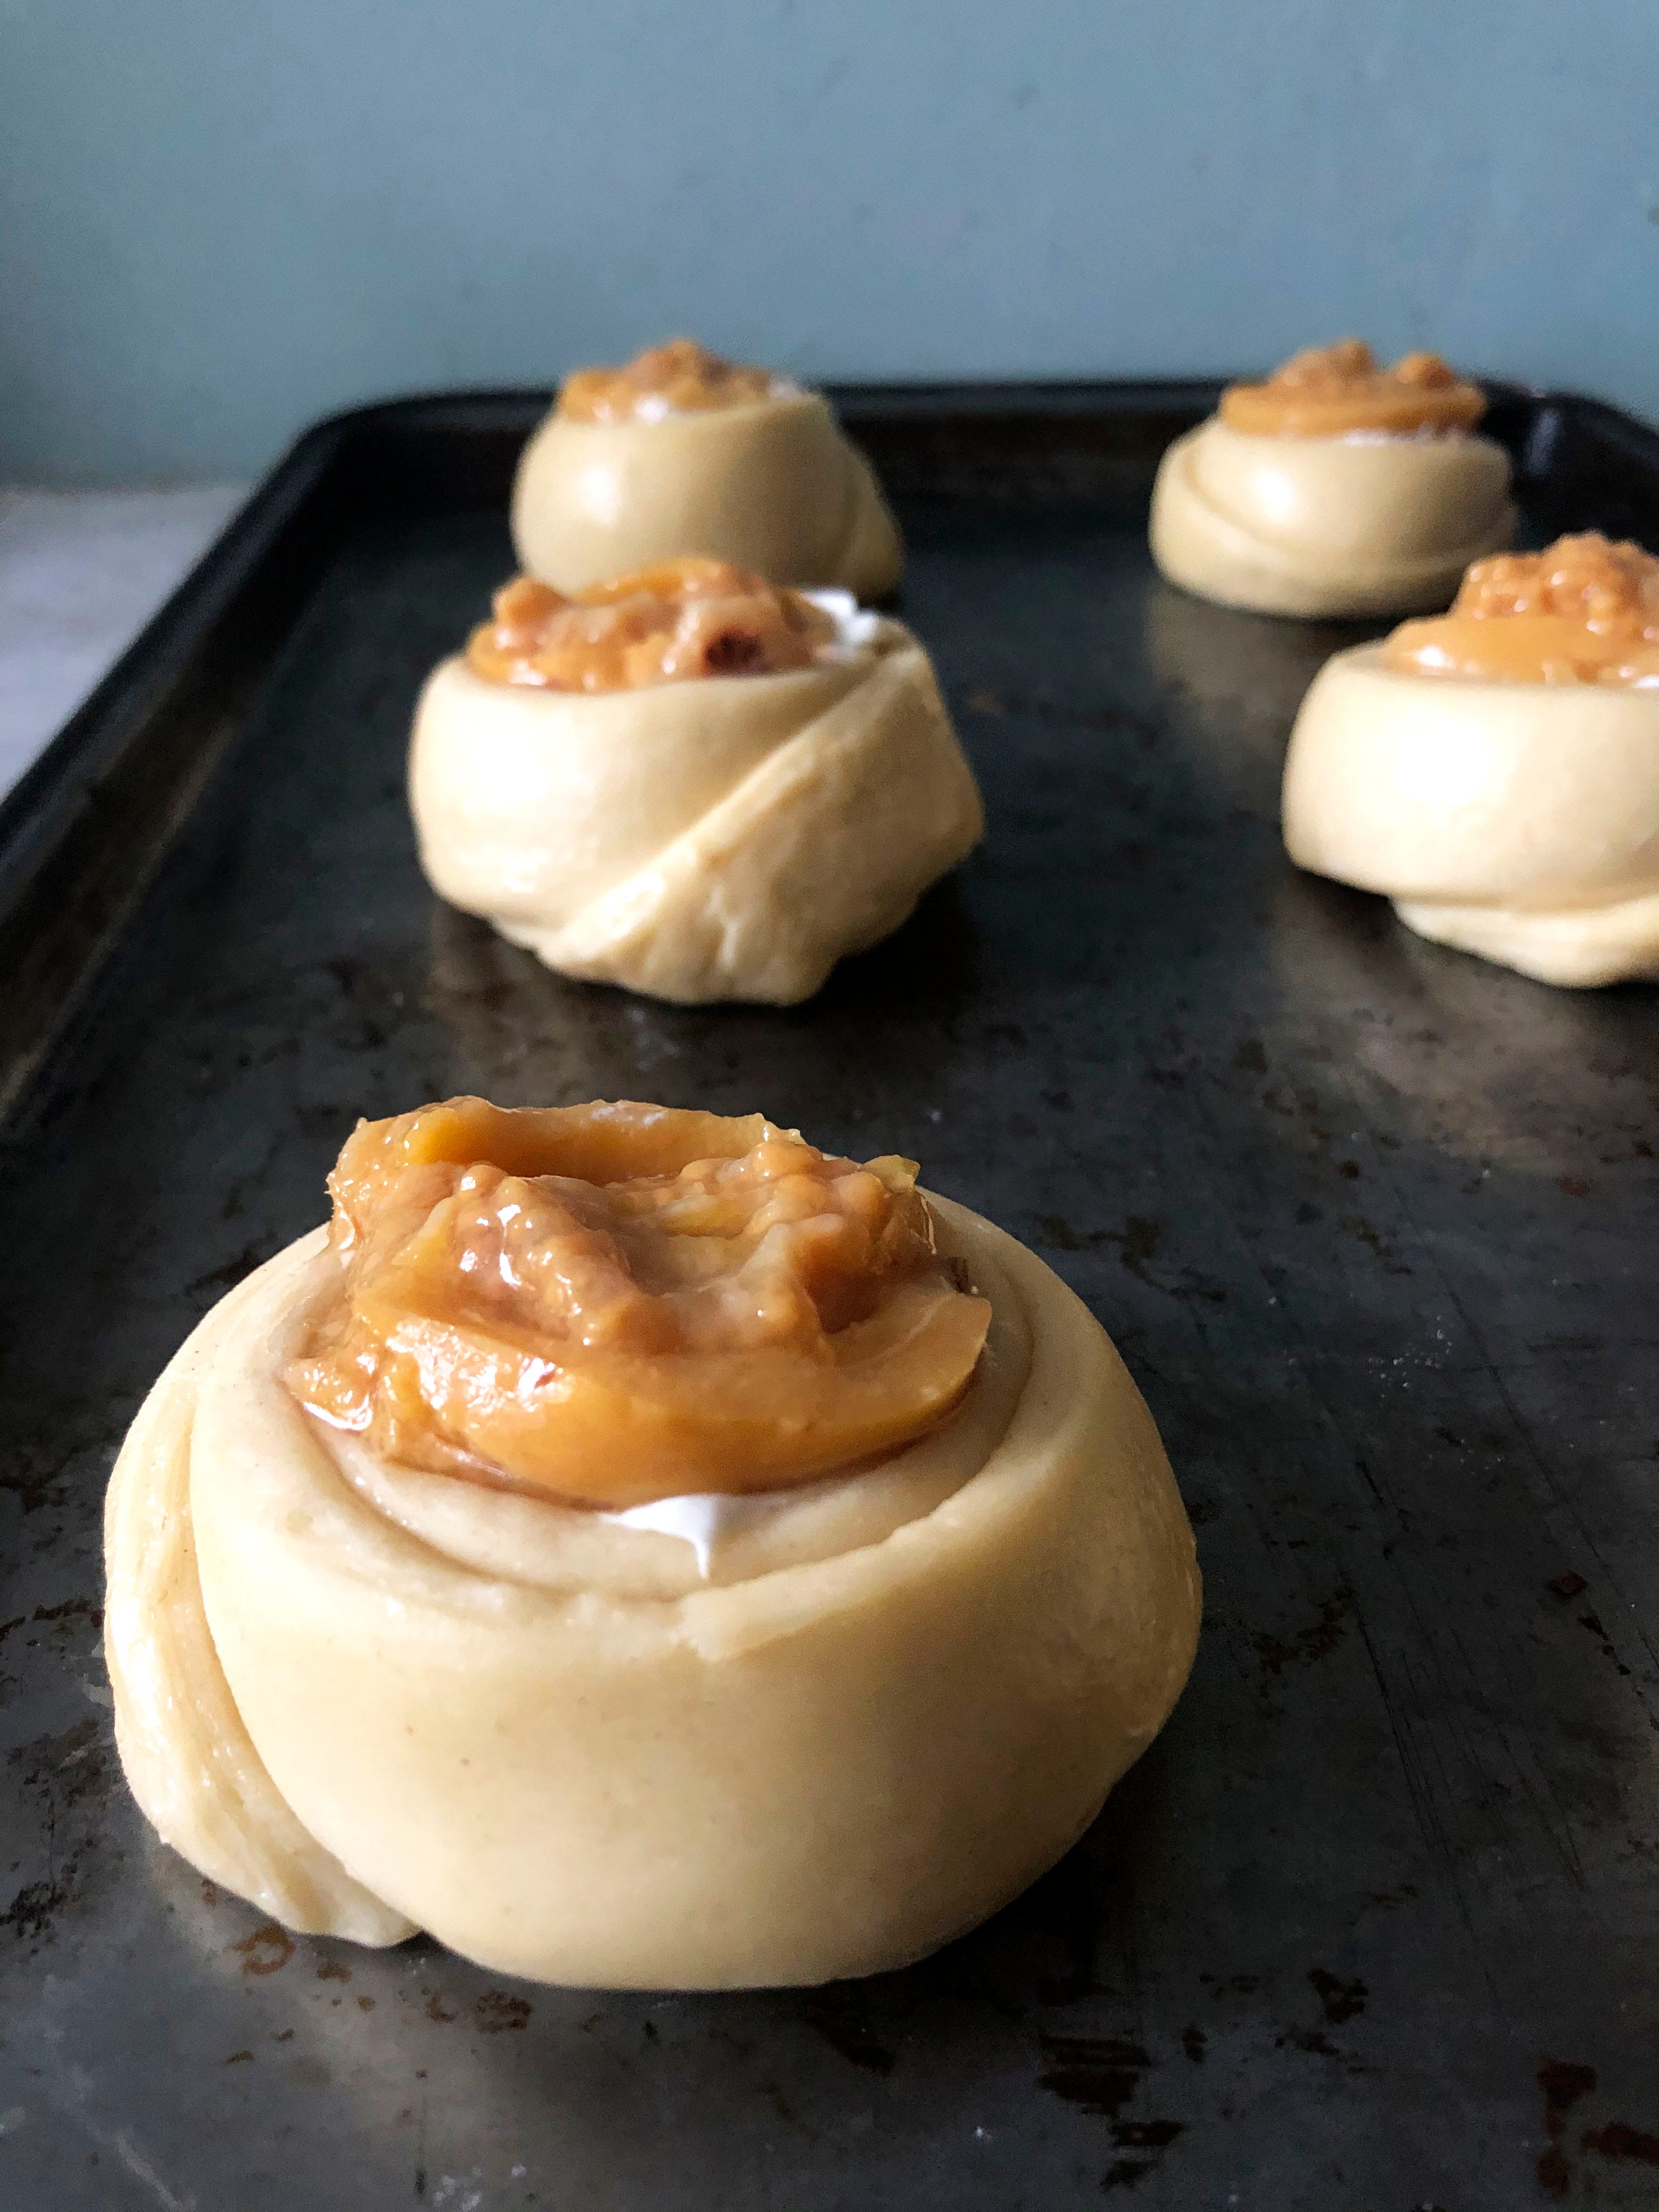
I used guavas from my grandmother’s dulce recipe instead of the guava marmalade, cause I had them in hand and thought it could be nice to stuff a half a guava inside the roll. If you want to do the same the recipe is easy: put some guavas in a pot, cover them with water, add half as much sugar as water, throw in some cinnamon and star anise, and let simmer until the guavas are cooked and the liquid has a syrupy consistency. If you prefer to use guava marmalade and want to do your own I have a recipe here.
*Cream cheese
Beat a cup of whipping cream, add a cup of cream cheese, and a pinch of salt.
Fill & bake
Heat the oven on at 200ºC.
Push the center of the rolls down with a spoon, and stuff the cream cheese and marmalade inside (or half a guava if you went for the dulce option).
Coat with egg wash again, put in the oven, and let cook for around 20 minutes, or until the surface of the rolls is golden.
Eat while still hot ;)
Se ven buenísimos Renata. A ver qué día me aventuro hacerlos xx
Me encantó tu post! Ha sido muy interesante leerte.
La receta me intimida un poco pero seguro la intentaré.
Gracias Renata por compartir!!